Landing page? Check. Bid? Double-check. Ad? Better download Google Web Designer.
While Google’s ad creator can’t help your team wordsmith persuasive ad copy, it can help your business design responsive and attractive ads, which is critical in display advertising.
Ready to learn how to make the most of Google’s ad builder?
Keep reading to get started! Or, get a professionally designed ad (and a custom campaign strategy) for your pay-per-click (PPC) advertising campaigns by taking advantage of our PPC management services. Just call us at 0802-583-7481 or contact us online for a free, custom quote!
1. Download Google’s ad creator
Before your team can start designing ads in Google Web Designer, you need to download it.

Google’s ad creator is compatible with several operating systems, including Mac, Windows, and Linux. If you’re using Windows, have Windows 7 or later installed on your computer. For Mac devices, you’ll need OS 10.10 or later.
Once you download and install the display ad builder, it’s time to create your first ad.
2. Choose your template or create your own
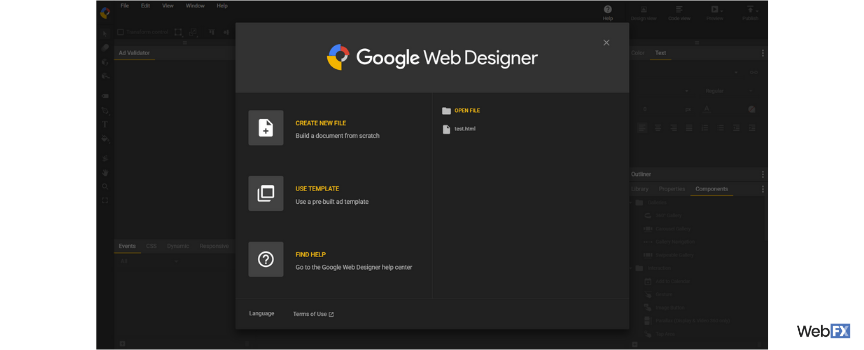
Open Google Web Designer.
As soon as you open Google ad creator, you’ll see a pop-up menu that lets you create a new file, use a template, open a file, or ask for help. If you’re new to designing display ads, start with a pre-built ad template.
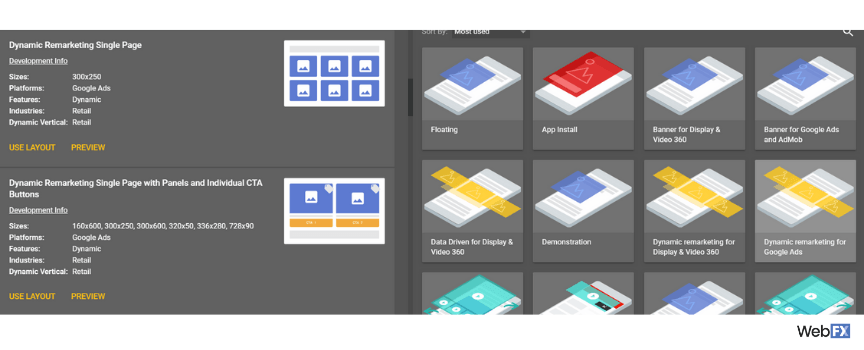
If you build your ad from a template, Google Web Designer offers more than 10 templates, including:
- App Install
- Banner
- Lightbox
- In-stream video
- Expandable
You can also filter templates by ad type, dimensions, devices, and even industries.
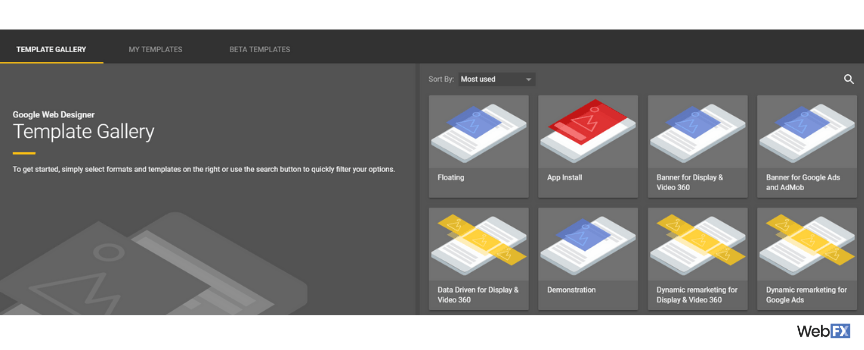
Even better, when you select a template, you can choose from different layouts. You can also preview each layout before deciding to use it. This feature of Google’s display ad builder saves time, plus makes choosing your design hassle-free.
Ok, but what if you’re creating a new file, without a template?
If you decide to work from a blank file, you’ll need to complete the following:
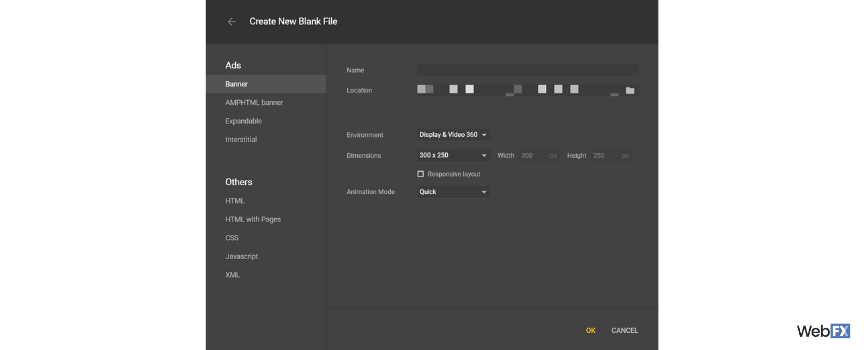
- Choose your type of ad, like banner, expandable, or interstitial
- Name your filename
- Select your save location
- Add your file dimensions
- Pick your environment
- Check your animation mode
Finish these steps and Google Web Designer will load your document.
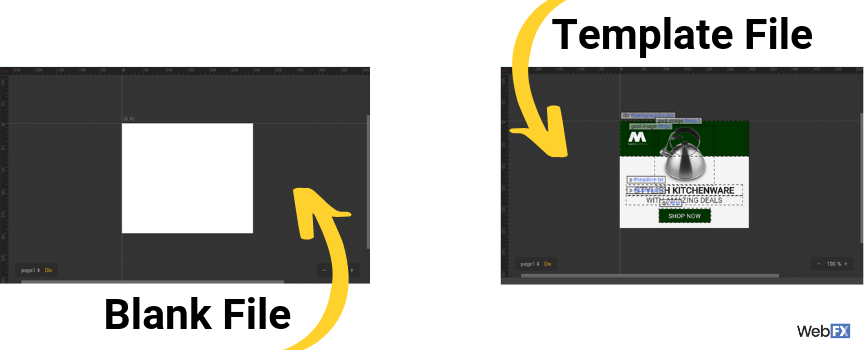
With your blank or template file loaded, you’re ready to move onto building your ad.
3. Customize your workspace
In most cases, however, you’ll want to update your workspace before starting.
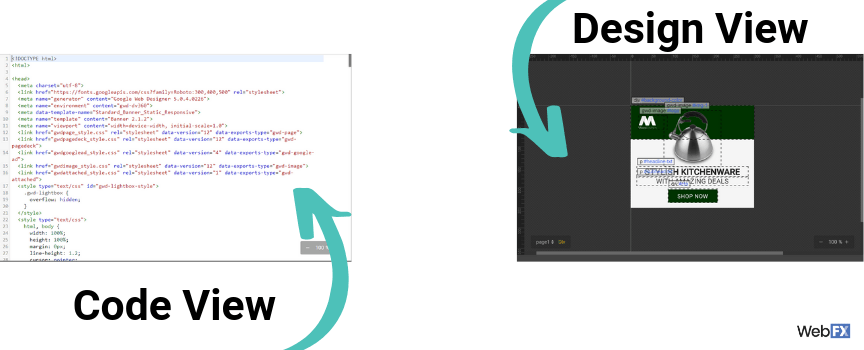
For example, you can switch between a design or code view when working on your ad. This feature makes Google’s ad creator a tool for both designers and developers, which is useful when you’re coordinating between team members.
A few additional features you can change in Google Web Designer include:
- Location of menus
- Arrangement of menu items
- Visibility of menus
- Type of workspace
- Color of guides
If you use the “Window” dropdown menu, you can view your menus, plus update your workspace type.
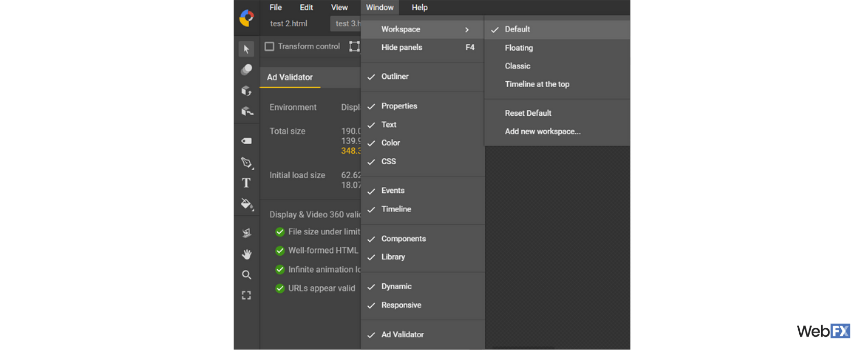
For the best experience, take the time to customize your workspace. This step also helps you become more familiar with Google’s ad creator before you start working on your ad. Use this time to explore the different tools and options.
4. Create your color scheme
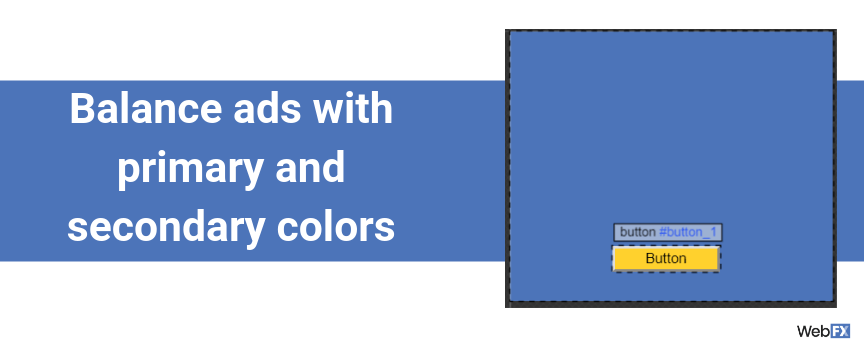
Now that you’re familiar with your workspace and have your document ready, your team can start designing your ad. While every designer differs in their process, it’s helpful for your team to decide on your color scheme at the beginning.
Expect to use your company’s colors in your ad. Depending on your business, you may have official primary and secondary colors to use. If that’s the case, you want to balance your ad between these two color sets.
For example, you may use a primary color for your ad’s background and then a secondary color for your ad’s button. Generally, your secondary colors feature brighter shades, likes yellow, which is why they’re excellent for call-to-action (CTA) buttons.
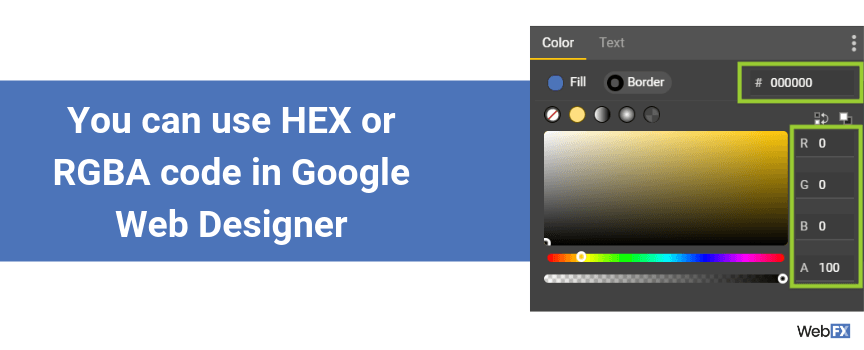
Once you have your colors picked, make sure to have their color codes on hand. In Google ad display builder, you can use the HEX code or RGBA code. You cannot use the CSS color name, like navy, unless you’re working within the code view.
5. Write your ad copy
In most cases, your team will write your ad copy before opening Google Web Designer. Sometimes, however, it’s helpful to see how your copy will look on an ad before committing to it. With a preview in Google’s ad creator, you can see what you need to change at the start of the design process.
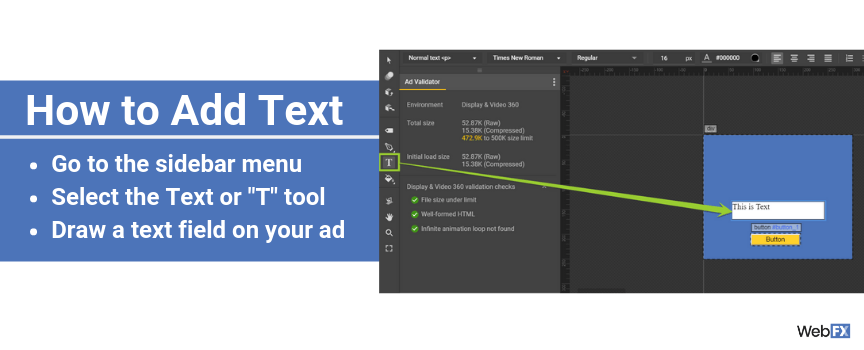
If you’re ready to add text to your design, follow these steps:
- Go to the sidebar menu
- Select the Text tool, represented by a “T”
- Draw a text field on your ad
Next, you want to add text.
After you update your text field, you can change the font, size, position, color, and format of your text. Highlight your text with your cursor, and then access the menu above your ad draft. You can also edit your text via the Properties menu.
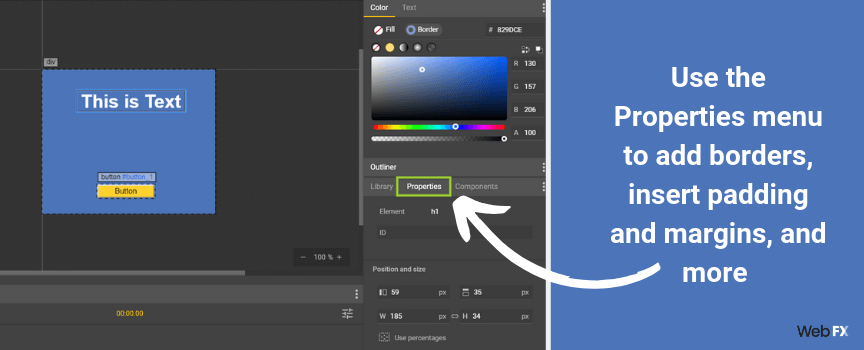
Via the Properties menu, you can also make additional updates to your text.
For example, you can change the translation, rotation, and scale of your copy. If you update the scale or size of your text field, make sure to enable the link icon, which will prevent your field from becoming stretched.
Some other ways you can modify your text field in the properties menu include:
- Add a border and change its color, size, and style
- Insert padding and margins
- Change the fill, opacity, and visibility
Once you’re satisfied, you can move onto adding any other creative elements, like images.
6. Add your images
Depending on your design, your team may use images in your ad.
If you do, Google ad creator makes it easy not only to add images but also galleries, which include:
- 360 galleries
- Carousel galleries
- Swipeable galleries
Add an image gallery to your ad with the following steps:
- Go to the Components menu
- Select the Galleries folder
- Drag and drop your gallery

Next, upload your images:
- Select your gallery
- Click the Properties menu
- Scroll down to Carousel Gallery
- Click the image icon
- Upload your files from your computer or via URL

After you add your images, you may want to resize and align your gallery before previewing it.
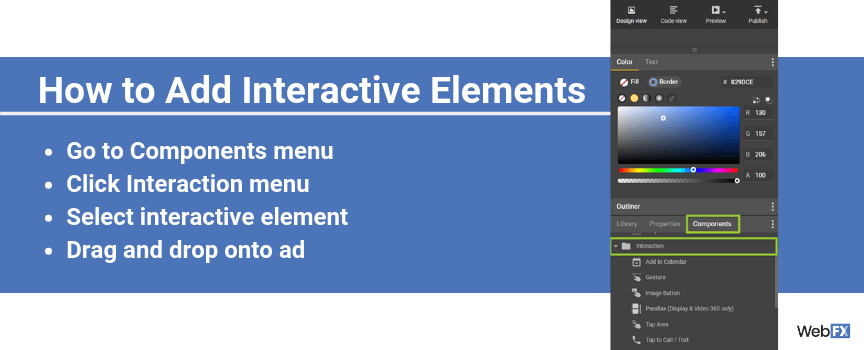
7. Select your interactions
In Google’s display ad builder, you can also include interactions with your ads. Interactions can range from users tapping a button, scrolling through a set of images, tapping a checkbox, and more. While your team may not use all these interactions, some offer your ad a competitive advantage.
For example, if your business provides emergency plumbing services, you may want to use an interactive element to allow users to call your company. Or, if you manage an ecommerce store, you may include an interactive button for a product image.
Either way, if you want to add interactive elements, all you have to do is follow these steps:
- Go to the Components menu
- Click the Interaction menu
- Select your interactive element
- Drag and drop it on your ad
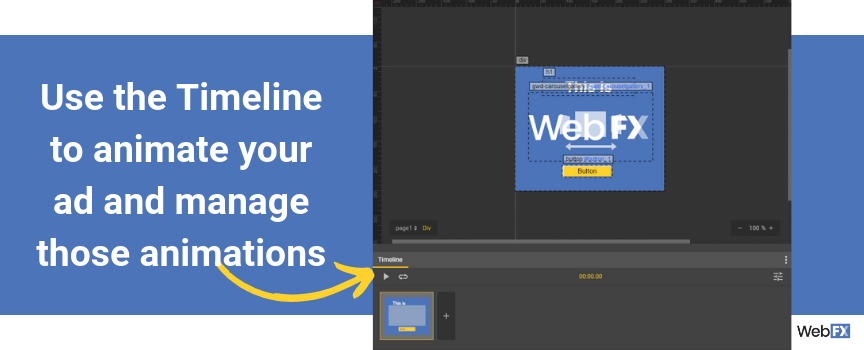
Depending on your interactive elements, as well as overall ad design, you may need to add layers to animate your ad. At the bottom of Google’s ad creator, you can animate your ad and manage those animations, with the timeline.
Animate your ad with these steps:
- Click the plus icon in the Timeline menu
- Select the new slide or layer
- Add your animation to the ad design
- Hit the play button in the Timeline menu to preview the animation
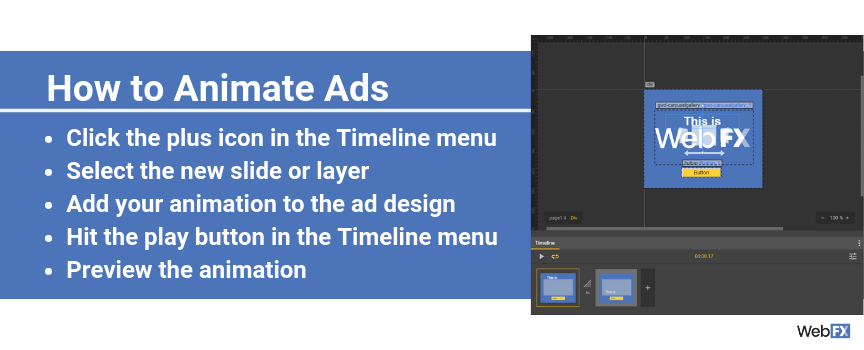
If you need to watch an animation several times, you can hit the repeat button next to the play button. It’ll loop your animation, allowing your team to check the animation and make notes for changes.
8. Preview your ad
With your ad colors, copy, and creative assets added, your team can preview your ad. For the best experience with Google’s ad builder, it’s helpful to preview your ad throughout the design process. That way, you can catch and fix design issues early.
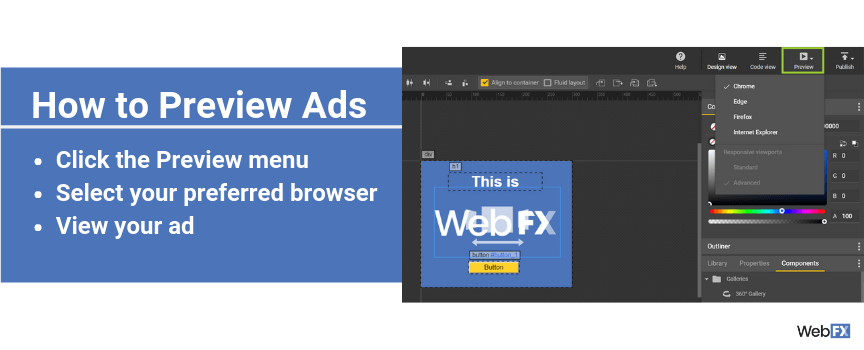
Previewing your ad with Google Web Designer is easy. Just follow these steps:
- Click the dropdown Preview menu
- Select your preferred browser
- View your ad
The best part is that your team can test the interactive features of an ad with the preview mode. For example, you can check that a button works, transitions trigger, and more. All these features make it easy for your business to launch an ad that delivers.
9. Publish your ad
Ready to launch your ad? It’s simple with Google ad creator.
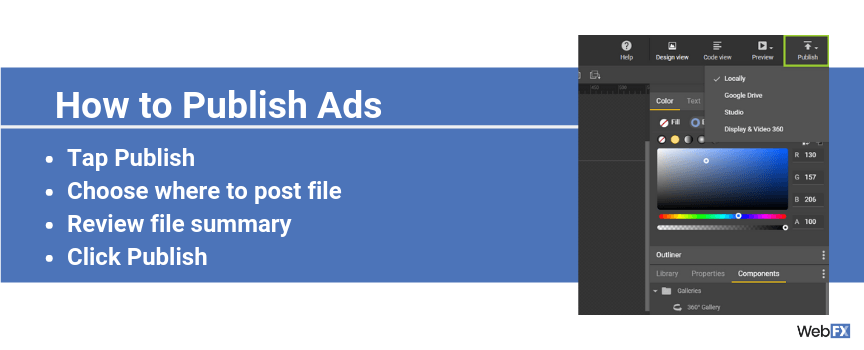
Just follow these steps:
- Tap Publish
- Choose where to post your file
- Review your file’s summary
- Click Publish
Once you publish your ad, you can upload it to Google Ads campaign.
Need help designing your Google ads?
When you’re planning a display advertising campaign on Google, your ad is essential. It needs to have not only persuasive ad copy but also an eye-catching design that makes users click on your ad and act on your call-to-action.
Google Web Designer provides your team with a robust program for designing responsive ads for your campaign. It doesn’t replace, however, the expertise of designers or developers. That’s why Tested Technologies offers competitive PPC services, which include ad design from our award-winning team.
Contact us online today to get professional designs for your ad campaigns!
The post Google Ad Creator: How to Use Google’s Display Ad Builder appeared first on Tested Technologies Blog.