Introduction and background
Photoshop has been the world’s top image editor for so long that it’s hard to remember things ever being any different.
But now it has a brand new rival, in the form of Serif Affinity Photo. Launched as a public beta in February 2015, it’s now scheduled for release in the summer of 2015 at the same price as the company’s vector drawing app Affinity Designer (£39.99/US$49.99 from Mac App Store).
We’re testing what the company describes as a ‘late beta’. It requires a 64-bit Mac, but it’s compatible with any version of the Mac OS from 10.7.5 Lion or onwards.
What makes Affinity Photo different
Serif is better known in the Windows world, for its range of low-cost, amateur-orientated alternatives to professional applications, such as PhotoPlus and DrawPlus. But the Affinity series is very different.
First, it’s designed from the ground up solely for Macs. Second, it’s designed not for amateur Photoshop wannabees, but as a direct Photoshop rival – Serif wants to be very clear about this. Third, it’s the second in a trio of professionally-orientated ‘Affinity’ applications sharing the same core processing engine and file format and designed, eventually to dovetail together in the same way as Photoshop, Illustrator and Indesign, but with directly transferrable files.

Affinity Designer has already been making waves as a fast, affordable and powerful Illustrator rival and the third program, Affinity Publisher is due in late 2015.
You can try out the free Affinity Photo public beta right now. You will need a 64-bit Mac, but it’s compatible with any version of the Mac OS from 10.7.5 Lion or onwards.
Why do you need it?
Affinity Photo is an important and much-needed rival to Photoshop. Photoshop has some flaws that we’ve got used to, including a number of ‘non-live’ effects and processes where you have to try some settings, wait to see the effect, then go back and try again if it’s not right. It also has a new subscription payment plan that some users will never get used to.
Affinity Photo’s brand new architecture, however, is designed for live previews and redraws of even complex tools and effects, and it’s available from the App Store as a one-time purchase, not a subscription. Serif says, ‘we don’t do subscriptions’.
Personas – workspaces reimagined
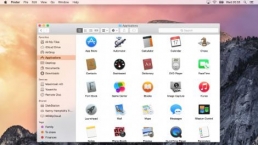
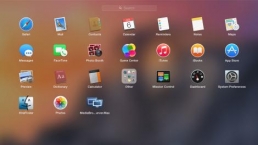
At first sight, Affinity Photo looks a lot like Photoshop. Down the left is a vertical toolbar containing a familiar set of tools and on the right is a stacked system of expanding/collapsing palettes.
There is a difference, though. At the top left of the window is a row of ‘Personas’, which could at first glance be mistaken simply for different workspaces; in fact, they put Affinity Photo into different editing modes.

Liquify persona
The Liquify persona is just like the Liquify window in Photoshop, but feels faster and more fluid. It’s also possible to ‘freeze’ parts of the scene which you want left alone and carry out your pinch, push and twirl adjustments around them.
The maximum brush size is limited to 1024 pixels in this version, however, which is fine for manipulating small objects but not really large enough for large-scale distortions.

RAW Develop persona
This is the equivalent of the Adobe Camera Raw dialog in Photoshop. It lacks a little subtlety compared to Adobe Camera Raw, but then this is only the beta version. It can set black and white points automatically, and you can change these later to extract the full dynamic range of your raw file, but it doesn’t have the camera calibration options in ACR for mimicking the camera’s own colour reproduction. There are manual chromatic aberration and lens correction tools, and Serif is planning to ‘crowdsource’ lens profiles which can be applied to raw files automatically.
The Raw Develop persona has a full range of colour and tonal adjustment controls, and it’s also possible to apply localised adjustments with gradient and brush tools – just like Adobe Camera Raw.
The current beta was launched with raw support for some of the very latest cameras at the time of writing, including the Canon 5DS, 5DS R, 750D, 760D, EOS M2 and M3, Fuji XQ2 X-A2, Nikon: D7200 and Nikon 1 J5, Pentax K-S2 and Samsung: NX500. If Serif continues to be this fast out of the blocks with support for new cameras, that’s going to be a big feather in its cap.
Export persona
The Export persona does exactly as you’d expect, exporting your images in a range of formats using adjustable parameters (JPEG quality, for example) and presets. But it’s also useful for web designer – it can split images into slices for export, based on layers and areas.
Photo persona
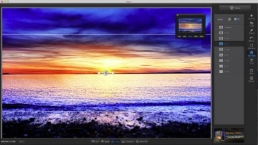
The Photo persona is where you do all your serious work. This is the principal editing environment while the others are designed for specific tasks.
Key features
Affinity Photo is a serious application, going toe-to-toe with Photoshop in the high-end/professional imaging arena. Most editing is carried out on RGB images, but Photo also offers ‘end-to-end’ CMYK colour editing – it also offers ‘soft proofing’ adjustment layers so that you can non-destructively tweak your images for different output devices.
Affinity Photo uses its own file format, but it can import and export Photoshop PSD files. It will also work directly with Photoshop-compatible plug-ins, though this is still in ‘preparation’ in this beta version. You can quickly locate existing plug-in folders within the program’s Preferences panel, and Serif is talking to developers to arrange direct plug-in installations.

The screen layout is very similar to Photoshop’s, with a vertical tools panel on the left and stackable, collapsible palettes on the right. The top toolbar contains options for the currently selected tool.
Photo doesn’t have image cataloguing tools, but it does have a handy media browser. You can add your own favourite folders to a panel at the top, then select a folder to see its images in the lower panel. It can also read the contents of your Apple Photos and Aperture libraries.
If you’re familiar with Photoshop and other image-editors, it won’t take you long to find your way around. You can add adjustments like Curves, Levels, Black and White and so on to your images as non-destructive adjustment layers, but panels also have a ‘Merge’ button in case you want to flatten the adjustment into the layer straight away for a permanent effect.

You can also combine images in multi-layer montages, of course, and here Photo provides a similar set of selection tools to Photoshop. The Selection Brush works well for initial adjustments, and there’s a Refine Edges panel where you can smooth, expand, feather and contract your selection and paint over tricky edges, like human hair, trees and other irregular outlines – it’s straightforward and does let you blend in tricky edges very effectively.
One interesting feature here is Photo’s non-destructive scaling. If you downsize an image layer in Photoshop it’s permanently downsampled – but Photo retains the layer’s full resolution, so you can increase the size of a layer later if you realise you’ve made a mistake. This is especially useful when adding objects to images in illustrations or artwork, for example.
Live editing
Affinity Photo has powerful retouching tools too, found on a flyout near the bottom of the tools panel. These include a Healing Brush, Patch Tool, Blemish Removal Tool, Inpainting Brush and Red Eye Removal Tool.
Let’s go back to this Inpainting Brush. This is actually a direct equivalent of Photoshop’s content-aware fill technology, but applied in a very simple way – you paint over an object you want to remove, release the mouse button and the software fills in the space automatically with nearby image data. It doesn’t work every time, but when it does it’s a simple instant fix – and where it doesn’t, you can always fall back on Photo’s regular Clone Brush Tool.
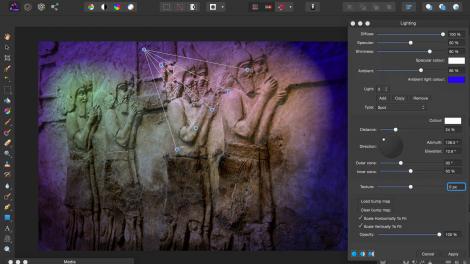
The Lighting filter is one example of where Photo carries out a filter operation ‘live’ that you’re used to having to do in a remote window in Photoshop. The principle is much the same – you can ‘relight’ a scene by adding as many virtual lights as you like, adjusting the properties for each. In Photo, though, you add the lights directly to the image in the main window. Each light has a set of control handles for adjusting its height, width and direction, and the effect is visible instantly, even as you drag the handles.

The Depth of field blur tool is equally instant, and with Elliptical or Tilt Shift modes it’s broadly equivalent to Photoshop’s Blur Gallery. There’s a Clarity option to help your subject stand out more clearly, though. The Zoom and Radial Blur filters are especially quick to apply and they work on the image in real time too – in Photoshop, these have to be set in a small window, tried out and redone if they’re not right.
It looks like Serif has achieved its aim of making Affinity Photo fast and intuitive. But Serif has Photoshop firmly in its sights and it’s keen to distance Affinity Photo from Pixelmator, another fast, clean and (relatively) new Photoshop alternative.

Pixelmator is fast and effective in its own way. It’s particularly good at image effects and quick enhancements, and it has painting and drawing tools too. But it doesn’t have Affinity Photo’s depth of control, non-destructive workflow or Photoshop compatibility. Pixelmator is a fast, lightweight Photoshop alternative for those who don’t need professional levels of control, whereas Affinity Photo is a direct rival.
Clearly, this late beta version still needs some polishing, and if you’ve arrived fresh from Photoshop you will need to spend a while getting ‘under its skin’ – but it’s worth the effort, because Affinity Photo is looking like the real deal.
- Camera reviews
- Best photo editing software
- Best free photo editing software
![]()
Related Posts

Apple to Pay $250 Million Settlement Over Misleading iPhone AI Siri Features
Apple has agreed to a $250 million…

OpenAI in Court: Greg Brockman, Elon Musk, and the Battle Over AI’s Future
OpenAI’s president Greg Brockman takes…

Reggie Fils-Aimé Reveals Why Nintendo Stopped Selling on Amazon in the DS Era
Former Nintendo of America President…

Musk v. Altman: Revealing the Early Secrets of OpenAI
Get an inside look at the Musk v.…

Apple’s “Ultra” Era: The Next Evolution for iPhone and Mac
Apple is rumored to expand its ‘Ultra’…

How AI Is Changing Breakups: A Look at Digital Relationship Endings in 2026
Breaking up is never easy, but in 2026,…

Elon Musk’s Courtroom Performance Raises Eyebrows in Musk v. Altman Trial
Elon Musk appeared less prepared and…

Jury Selection in Musk v. Altman: Public Opinion Challenges Elon Musk in Court
Jury selection in the high-profile Musk…
Google’s New Gradient Icons: A Fresh Look Coming to More Apps
Google is expanding its new gradient…

GPT-5.5: OpenAI’s Latest Breakthrough Is Resetting the AI Bar
OpenAI’s GPT-5.5 has arrived, setting a…

Xbox Game Pass ‘Starter Edition’ Leak: New Bundle with Discord Nitro Revealed
A new leak reveals Microsoft is…

DJI Launches Lito Series: Affordable Entry-Level Drones Starting Under $400
DJI introduces the Lito 1 and Lito X1,…

The End of Human Intimacy: How AI Companions Are Rewiring Our Emotional Lives
Are AI companions truly filling the…


The new brand identity
When you are alone for days or weeks at…