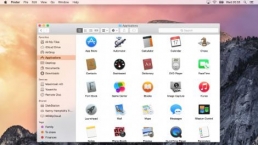
Since the introduction of Lion, Apple has included a special section in the Finder called “All My Files.” As its name implies, it finds and displays all of the files on your system when clicked.
This is great when you want to view a listing of all the files on your system sorted by modification time, but what if you want more control over this section of the Finder? It’s possible, and we’ll show you how to do just that in this Easy Mac Hacks article.
The “All My Files” section of the Finder is just a fancy Smart Folder. Before Mavericks, you’d have to go through the Terminal to hack your way around and customize this Smart Folder behavior, but now it couldn’t be more simple.
How to do it
- Open a new Finder window.
- Select “All My Files” from the sidebar.
- Click the Action icon in the toolbar. (Hint: it looks like a gear.)
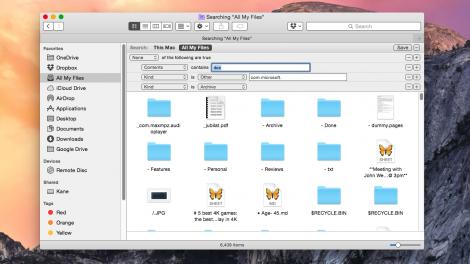
- Select “Show Search Criteria.”
- Once you do this, you’ll be presented with a list of criteria that the Finder uses by default to find all of the files on your system.
Using the filtering UI, you can remove any currently displayed filters by pressing the “-” button beside of the criteria; or, you can add new criteria by pressing the “+” button on any of the criteria items, then filter to your heart’s content.
When you’re done, press the “Save” button at the top of the filtering list. Be sure to make a note of the default filtering items in case you ever wish to restore the functionality to the defaults without reinstalling the operating system!
![]()
Related Posts

Apple to Pay $250 Million Settlement Over Misleading iPhone AI Siri Features
Apple has agreed to a $250 million…

OpenAI in Court: Greg Brockman, Elon Musk, and the Battle Over AI’s Future
OpenAI’s president Greg Brockman takes…

Reggie Fils-Aimé Reveals Why Nintendo Stopped Selling on Amazon in the DS Era
Former Nintendo of America President…

Musk v. Altman: Revealing the Early Secrets of OpenAI
Get an inside look at the Musk v.…

Apple’s “Ultra” Era: The Next Evolution for iPhone and Mac
Apple is rumored to expand its ‘Ultra’…

How AI Is Changing Breakups: A Look at Digital Relationship Endings in 2026
Breaking up is never easy, but in 2026,…

Elon Musk’s Courtroom Performance Raises Eyebrows in Musk v. Altman Trial
Elon Musk appeared less prepared and…

Jury Selection in Musk v. Altman: Public Opinion Challenges Elon Musk in Court
Jury selection in the high-profile Musk…
Google’s New Gradient Icons: A Fresh Look Coming to More Apps
Google is expanding its new gradient…

GPT-5.5: OpenAI’s Latest Breakthrough Is Resetting the AI Bar
OpenAI’s GPT-5.5 has arrived, setting a…

Xbox Game Pass ‘Starter Edition’ Leak: New Bundle with Discord Nitro Revealed
A new leak reveals Microsoft is…

DJI Launches Lito Series: Affordable Entry-Level Drones Starting Under $400
DJI introduces the Lito 1 and Lito X1,…

The End of Human Intimacy: How AI Companions Are Rewiring Our Emotional Lives
Are AI companions truly filling the…


The new brand identity
When you are alone for days or weeks at…