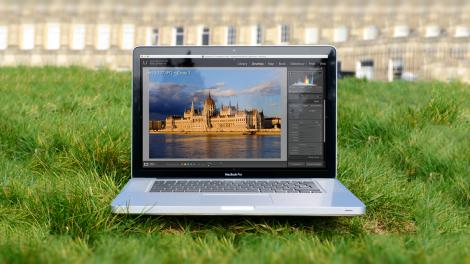
Introduction and features
Adobe has just announced Lightroom CC and Lightroom 6, the latest versions of its professional photo cataloguing and editing software. They’re actually the same program, but Lightroom CC is the version that’s integrated into Adobe’s subscription-based Photography Plan, part of its Creative Cloud service, while Lightroom 6 is the ‘perpetual licence’ version which you pay for and use in the old-fashioned way.
The advantage of Lightroom CC is that you get all the benefits of the Creative Cloud system, including online storage and display and the ability to synchronise collections with mobile devices like phones and tablets.
Lightroom 6 is for folk who don’t like the idea of software subscriptions. The disadvantage here is that you don’t get the Creative Cloud features and when Lightroom 7 comes along you’ll have to pay to upgrade.
What does it do?
Lightroom is Adobe’s professional image cataloguing program and it’s designed to be used alongside a regular image-editor like Photoshop, though as Lightroom’s editing tools get more and more sophisticated, it can often do all the image-editing work you need on its own.


You’ll still need a program like Photoshop for layers, montages, masks and other heavy-duty manipulation, but Lightroom is fine for adjusting exposure, contrast and colours, cloning out sensor spots and unwanted objects, adding graduated filters for skies and radial filters for vignette effects – it even has adjustment brushes for enhancing selected areas of the photo.
Basically, if you need to combine images and make precise collections, you need Photoshop (or some other image-editor), but if you simply want to enhance single photos the Lightroom can almost certainly do it on its own.

Lightroom is not the same as Bridge, Adobe’s folder browsing tool. Bridge is designed to show you the contents of folders on your hard disk in real time and with no centralised database to speed up searches. It’s fine for simple filing systems, but no good if you need to search for images by keyword, camera uses, location and a host of other possible parameters. This is where you need Lightroom. It’s much more powerful and is designed for large image collections, which it can filter, search and organize in seconds, regardless of where the photos are actually stored.
You start by importing photos into the Lightroom library. It can then show you your pictures in a Folder view showing the folders on your computer, but you can also create Collections (and Smart Collections) which are independent of the original folders and can form the basis of a fast, flexible and adaptable filing system for your photos.
Lightroom’s editing tools
Lightroom’s editing tools don’t reach the same depths as Photoshop’s, but that’s because it’s working within the limitations of a non-destructive process. Lightroom’s adjustments simply change the appearance of the picture within the program itself – the original photos remain completely unaltered. To create permanent copies of your adjustments you export your edited images as new JPEG or TIFF files.


Lightroom’s editing tools are now so powerful, though, that you may not need a separate image editor for most of the things you do. It can adjust exposure, contrast, ‘clarity’, white balance, saturation and more. It has in-built lens correction profiles to counteract distortion and chromatic aberration in lenses, and it has geometric correction tools for fixing perspective issues, like converging verticals in tall buildings.
In particular, it can apply ‘localised’ corrections. You can paint adjustments on to areas of a picture using the Adjustment Brush, darken bright skies with the Graduated Filter tool and create subtle vignette effects with the Radial Filter.
You can even clone out sensor spots, blemishes and even whole objects with the Spot Removal tool, which is much more powerful than the name suggests.
So what’s new?
Adobe has introduced new tools for organizing your photos into Lightroom 6, but the main additions are to the editing tools. There are exciting new panorama and HDR tools, and it’s now possible to ‘brush out’ areas adjusted with the Graduated and Radial filter tools – a really useful enhancement.
Lightroom 6 introduces face-recognition to help organise pictures of people and it comes with new HTML5 web galleries and a major upgrade to the Slideshow tools so that you can now create more movie-like experiences.
We’ll take a closer look at these new features on the following pages.
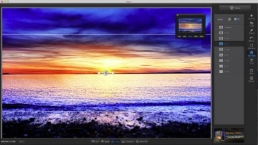
HDR Merge and Panorama Merge
These two features are brand new in Lightroom 6. Previously, if you wanted to stitch together multiple frames to make a panorama, or combine separate exposures into a single HDR (high dynamic range) image, you would have to send them to Photoshop.
But now, the same Photomerge technology used in Photoshop is built into Lightroom too – for these particular tasks, at least.
HDR Merge in action
HDR (high dynamic range) images can be tricky to get right. It’s easy enough to shoot a series of exposures of the same scene and there are plenty of programs which can merge these into an HDR image – Photoshop is one – but getting results which look realistic or pleasing takes a bit more work.
But Lightroom 6 makes it disarmingly simple by keeping the technicalities to a minimum yet delivering really good results.


First, you select the images you want to merge and then you choose the Photo Merge > HDR option from the menus and wait while Lightroom creates an HDR preview in a separate HDR Merge window. You can check the Auto Align box to make sure Photoshop adjusts any misalignment between images and the Auto Tone box to automatically correct the contrast and brightness of the result.
There are options too for ‘Deghosting’ the image, but these may only be necessary if you have moving objects moving between the frames, such as leaves and branches, or passers by.
When you hit the Merge button it can take a minute or so to blend the images, and once it’s done it’s clear that Lightroom has done something different and rather good. Instead of creating a lurid, ‘artistic’ HDR image with dramatic tonal contrast and ‘glow’ effects, it produces a very realistic image with all the shadows and highlights intact but without unrealistic tonal compression or flattened contrast.
Panorama Merge in action
The Panorama Merge feature could hardly be simpler. First, you select the individual frames of your panorama in Lightroom, then choose ‘Photo Merge’ and then the ‘Panorama’ option from the menu.
If you’ve done this before in Photoshop you’ll know that you’re then presented with a fairly complex dialog listing different layout options and a list of source files. Here, it’s much simpler. Lightroom offers three different ‘Projections’ – you can think of these as the surface you’re creating the panorama on. You can leave it to ‘Auto Select Projection’ or manually choose ‘Spherical’, ‘Cylindrical’ or ‘Perspective’. A cylindrical projection is usually best for regular single-strip panoramas.
Now you just decide whether you want Lightroom to ‘Auto Crop’ your panorama or not. The stitching process will leave ragged blank areas at the edges of the picture, and while Photoshop has special ‘content-aware’ technology to fill these in, Lightroom does not, so the Auto Crop option will save you having to crop the edges off manually afterwards.

And that’s it. Lightroom will produce a perfectly-stitched panorama with no further effort on your part. It works extremely well, and its a simplified version of the panorama tools in Photoshop, which makes it all the more welcome.
Panoramas don’t always have to be in a super-wide letterbox format, of course. Just two overlapping frames can be stitched together to produce a more normally-proportioned super-wideangle shot.
In a final twist, both the HDR and Panorama tools produce DNG files rather than JPEGs or TIFFs – and this gives much more scope for image manipulation and enhancement later.
Filter masking and brush changes
The secret of Lightroom’s success is the way that it combines powerful image cataloguing features with powerful editing tools. It’s not just a raw converter. As well as adjusting contrast, dynamic range, exposure, white balance and a whole host of other global image properties, it can apply localised adjustments to specific areas of a picture.
Where you might use an adjustment layer and a mask in Photoshop to darken a sky, for example, you can use the Gradient Filter in Lightroom. There’s also a Radial Filter for creating highly controllable vignette effects and subtly ‘relighting’ your pictures and a manual Adjustment Brush for painting over areas you want to modify.
But Lightroom adds two important modifications. First, it’s now possible to manually mask out areas modified by the Gradient and Radial Filters. This is really important because sometimes you’ll have buildings or other objects jutting out into a darkened sky – and you don’t want these objects darkened by the Gradient Filter. It’s a common problem that now has a solution.


Second, it’s now possible to move the ‘pins’ created by the Adjustment Brush. Previously, these were placed permanently at the point where you started brushing, and the only way to alter the area affected was to brush in new areas or erase areas you wanted left alone – the pins themselves were immovable.
Now you can simply drag the pins to new positions. It doesn’t really change the way the Adjustment Brush works – it doesn’t make anything possible that wasn’t before – but it does make using these brush adjustments simpler, quicker and much more intuitive.
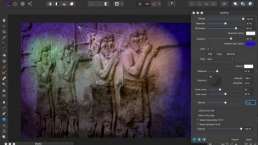
Filter masking in action
The new Filter masking tools are really simple to use because they’re just an extension of the familiar Adjustment Brush tools. Now, when you use the Gradient Filter to darken the sky, you’ll see a new ‘Brush’ tab alongside the Mask options. When you click this the panel expands to show the brush tools, where you can set the Size, Feather and Flow options for the brush.
There are two sets of brush settings, ‘A’ and ‘B’ for fast switching if you’ve got a tricky job that needs different brush types, and an ‘Erase’ option. This is what you use to mask out areas of the image that you want the Gradient Filter to leave alone.


If you check the ‘Auto Mask’ box it become simpler still, because now the brush will automatically follow well-defined object outlines, like buildings jutting up into the sky.
The same applies to the Radial filter, so that once you’ve used the filter to create the broad lighting effect you want, it’s a simple matter to brush in additional areas manually or erase the mask where needed.
Adjustment Brush changes
Lightroom’s Adjustment Brush is a deceptively powerful tool. At first sight it seems quite primitive because you simply drag the brush tool over the parts of the image you want to change – it looks a million miles from the sophisticated and precise selection and masking tools in full-on image-editors like Photoshop. Actually, though, it works rather well. Many of the enhancements you need to make to photos require a subtle blending-in of effects, not hard-edged selections – and if you do need to follow a hard edge, the Auto Mask option does a pretty good job.

The point about Lightroom’s Adjustment Brush is that all these adjustments are non-destructive. You can go back at any time to add to the mask, erase parts of it, tidy up edges and so on.
Once the mask is created, you can adjust the Exposure, Contrast, Highlights and Shadows, Clarity and more, and these adjustments are non-destructive and permanently editable too.
Lightroom is less sophisticated and powerful than Photoshop in a host of different ways, yet in others it offers a fresh and clever approach that you kind of wish you could use in Photoshop. (Actually, you can – you’ll find the same tools in Adobe Camera Raw and the ACR filter, but not in the main interface.)
Face detection and collection filtering
It’s a little odd to find face detection and recognition tools in a professional image cataloguing application, but maybe Adobe wants to broaden Lightroom’s appeal into the amateur market too. It is a great way to bring together all the pictures you have of your friends and family, and it ‘learns’ as it goes along so that its face recognition becomes more reliable.
At first, Lightroom can still identify unique faces and group them together, but you have to tell it who these people are. The more you use it, though, the more it’s able to suggest names automatically based on identifications you’ve made in the past.
Given that this is the first time Adobe has included face recognition in Lightroom, it feels like the finished article straight away – even if you’re not a big fan of face recognition, you can’t help but be impressed by how straightforward the Lightroom system is.


You can search your entire library for faces, but it’s not a particularly fast process, so it’s best to start small. If you come back from a holiday or trip with a few hundred pictures, you can open the Folder or Collection they’re stored in, then click the new ‘People’ button at the bottom of the Lightroom grid view. It then starts scanning all your pictures for faces.
This is likely to take several minutes, but you can start identifying people while it’s still working. In People mode, the grid view is split into two panels. The top panel contains ‘Named’ people, while the bottom panel displays ‘Unnamed people’. You type a name into the box below a person’s face in the lower panel, and it moves to the one above.
This doesn’t take as long as it sounds because Lightroom is quite smart. It groups similar-looking photos right from the start, displaying them as a single thumbnail image, so you only have to add a name to the group, not every photo within it.
And, as you add more and more pictures to the ‘Named’ panel, Lightroom gets smarter at recognising the same people in the ‘Unnamed’ panel, so that by the time you get to them you only have to agree with Lightroom’s suggestion – or, if necessary, type in a different name.
No face recognition system is perfect, and sometimes Lightroom will pull out sections of an image that aren’t faces at all. All you have to do here is click the ‘X’ box to remove them.
Lightroom tags pictures of people by adding the names you’ve typed in as keywords, so it’s a simple matter to find them later on by searching your library – or you could set up a Smart Collection with that keyword.
Collection filtering
Face recognition isn’t going to be top of everyone’s list, even though it’s touted as one of the main new features in Lightroom 6. But there’s another feature – also connected with searching – that’s much more important but only given a minor mention.
It’s called ‘Collection Filtering’, and it’s a new search box at the top of the Collections panel that lets you type in a name or a search string to find Collections with those words in the title.

This doesn’t sound like a big deal – unless you have a large Lightroom library with tens of thousands of images and, potentially, hundreds of named Collections. The larger your library, the more Collections you’ll create, and the harder it will become to find the one you want in a giant, scrolling list.
You know you’ve got a Collection called ‘Las Vegas at Night’, for example, but where is it? It may not even be visible at all if you’re in the habit of using Collection Sets and keeping them collapsed to save space. But now, if you start typing that Collection title into the new Collection Filtering box, it’ll find your Collection even before you’ve finished the second word (probably).
Or, if you like shooting black and white, and always include ‘black and white’ in the Collection title, this will find all your black and white Collections in just a couple of moments by typing this into the Collection Filter box. For photographers who rely heavily on Lightroom Collections for organizing their photos, this is a massive improvement.
Any Aperture fans reading this will be grinning through gritted teeth at this point. This is something that Apple’s own professional image cataloguing tool (now controversially dropped) did already.
Slideshows, galleries and more
There are a number of other significant improvements in Lightroom 6, some of which are more obvious (and useful!) than others.
For example, the Crop tool has a new ‘Auto’ button that uses some of the clever image-analysing ‘Upright’ tools in the Lens Correction panel. If you click the Auto button, Lightroom will straighten skewed horizons automatically by rotating the crop marquee. This saves time and effort trying to straighten images manually, and it’s reliable too – it correctly straightens a skewed photo almost every time.
Also new in Lightroom 6 is a CMYK soft-proofing option. ‘Soft-proofing’ enables you to check how your images will appear on different output devices in case you need to adjust the colours and contrast to suit them. The CMYK option is important because this is the process used for commercial printing, and there’s often a marked colour shift in the transition from RGB images (what the camera shoots and what you see on the screen) and the CMYK images that the printers need.
Adobe has also introduced a new pet-eye correction tool – it’s like regular red-eye correction for human subjects, but modified to allow for the different colours of animal eyes. This seems distinctly out of place in a program designed for professionals and advanced amateurs, but here it is anyway.
New slideshows and web galleries
More importantly, Adobe has made some big changes to its Slideshow module. Not everyone will use the slideshow tools, but professional photographers who want to create a multimedia portfolio, for example, will find they have a lot more power at their fingertips.


For a start, you now have a choice between slideshows that play back automatically or ones that offer manual control – you might choose this if you want to talk people through your slideshow, for example.
There’s a new Pan and Zoom slider to add motion to your still images (you can include video clips too), and the ability to add more than one background music track – handy if you want to show a longer presentation with lots of slides. Tracks you’ve added are shown as a list in the Music panel, together with their individual duration and the total time. You can drag tracks up and down the list to change the order.
There are two ways to synchronise your audio with your slides. One is to use the ‘Fit to Music’ button – this automatically adjusts the duration of each slide to match the total length of the audio tracks – you can still adjust the length of the Crossfade between slides.
The other is to synchronise the slide transitions with the beat of the music – a clever idea – though you’ll now need to manually match up the total slide duration time with the total audio time, which could prove trickier.
Finally, Adobe has added HTML5 galleries to its web templates as an up to date alternative to Adobe Flash, which is steadily falling out of favour. There are three new gallery templates: Grid Gallery, Square Gallery and Track Gallery.
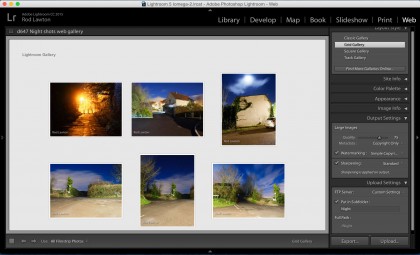
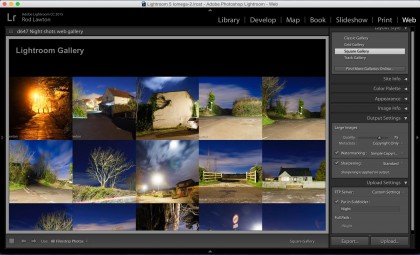
, 'Square' (middle) and 'Track' (bottom). You can export and upload galleries manually, or use Lightroom's built-in FTP transfer tools to publish them to your web server.")
The Grid Gallery is the most straightforward, displaying images as small thumbnails against a plain background. When you click on a thumbnail it opens a larger version of the photo and you can then use left/right arrows to cycle through the rest.
The Square Gallery works in a similar way except that thumbnails are displayed as a grid of square images with no gaps in between.
The Track Gallery displays thumbnails in rows – all the thumbnails are the same height and vertical images are simply reduced in size to be the same height as horizontal ones.
Web Galleries created in Lightroom can be saved as permanent collections within your library and they can be exported and published online in one of two ways: you can export them wholesale to a folder on your computer and then use an FTP client to upload them to your web server, or you can enter your FTP server’s login details in Lightroom itself and leave Lightroom to look after the FTP transfer. If you have your own web server, publishing web galleries with Lightroom could hardly be simpler.
Verdict
Lightroom CC brings a whole series of improvements over Lightroom 5, but it represents steady development, not a giant leap forward. Is it worth upgrading? If you own Lightroom 5 on a perpetual licence, it will cost you £59/US$79/AU$99 to step up to Lightroom 6, so it’s a close call – we probably would, but others might not.
But if you’re already in the Adobe Photography Plan, it won’t cost you a cent – the Lightroom CC upgrade is all part of the service.


So although many users will be relieved that Lightroom 6 will still be available on a regular perpetual licence, it’s getting harder and harder to find an economic argument against swapping to Adobe’s subscription service. You have to remember that you’re not just getting Lightroom but all the Creative Cloud ancillary services too, such as the ability to synchronise Collections with the Lightroom app on your tablet, and showing the same Collections as online web galleries that others can view.
Adobe says that Lightroom 6/CC also runs faster than its predecessor, though any improvements weren’t obvious in our tests.
We timed both versions while carryout out a set of routine tasks and the results were inconclusive. Lightroom 6 was a couple of seconds slower to launch, but it was a fresh installation so it was probably still caching library files. It did seem to be around 10% faster at importing a folder of images (600, in both JPEG and raw formats), but slower at rendering previews (Standard and Smart). It was around 15% faster at exporting 10 images as full-resolution JPEGs, though.
Lightroom 6 can now use your computer’s GPU (Graphics Processing Unit), though apparently this has most effect when carrying out processor-intensive editing tasks. This proved difficult to test because editing effects in Lightroom are typically quick to render anyway, so perhaps some more investigation is need to find some particularly taxing processes.
We liked
Lightroom very nearly gives you the best of everything. It’s a fast and powerful image organising and cataloguing tool which can also print images, turn them into slideshows and publish web galleries straight to your web server. Its editing tools just get more and more powerful with each version, and each time they do it reduces the time you need to spend in programs like Photoshop – in fact, you can find yourself processing, enhancing and finishing whole folders full of images entirely within Lightroom.

While there’s still resistance amongst some users to the idea of subscription-based software, the price you pay for the Photography Plan gets you Lightroom CC and Photoshop CC and free updates to both in the future.
We disliked
Lightroom still has some quirks which you might not notice if this is your first full-power image cataloguing tool, but if you’re an Aperture user on a Mac who’s been forced to migrate to Lightroom, there will be a few things which grate.
One of these is the way that Folders and Collections are entirely separate. It’s like having two parallel but separate filing systems. If you pick out some pictures within a folder to make a Collection, that Collection appears in an entirely separate panel.


Another is Lightroom’s stacking system. You can group related images together, such as shots taken in a sequence, for example, or different edits of the same image, but that grouping only exists within the Folder or Collection you created it in. If you look at the same photo in a different collection, it’s not grouped with those same images, but could be ungrouped, or grouped with a different set of images. Lightroom’s grouping feature can be useful, but it would be more useful still if it was consistent across your whole library.
Verdict
It’s not difficult to find reasons for recommending Lightroom – in fact, it’s hard to find reasons not to. If you’re a photography enthusiast, expert or professional you need software which can organise, output and enhance your pictures and, with a few minor quibbles and gripes, Lightroom does that perfectly.
It’s true that you’ll still need a full-blown editor for more complex tasks involving layers, masks and complex image-manipulation processes, but if you subscribe to Adobe’s Photography Plan you get that too, in the form of Photoshop CC. In fact, Lightroom and Photoshop work so well together that it’s as if they were designed that way.
You don’t have to use Photoshop with Lightroom. You can configure any other image-editing program to work as an external editor in just the same way. And all the top plug-in makers now produce Lightroom versions of their tools, so you can use them directly without having to switch to Photoshop first.
So do you choose Lightroom 6, the one-off perpetual licence version, for £104/US$149/AU$176, or opt for the subscription-based Lightroom CC + Photoshop CC Adobe Photography Plan at £102/US$120/AU$120? You may not like the idea of subscriptions, but if you go for the perpetual licence then in a year, or two years, when a new version of Lightroom comes out, you’ll have to pay for the upgrade, when Creative Cloud subscribers will get it for nothing.
![]()
Related Posts

Apple to Pay $250 Million Settlement Over Misleading iPhone AI Siri Features
Apple has agreed to a $250 million…

OpenAI in Court: Greg Brockman, Elon Musk, and the Battle Over AI’s Future
OpenAI’s president Greg Brockman takes…

Reggie Fils-Aimé Reveals Why Nintendo Stopped Selling on Amazon in the DS Era
Former Nintendo of America President…

Musk v. Altman: Revealing the Early Secrets of OpenAI
Get an inside look at the Musk v.…

Apple’s “Ultra” Era: The Next Evolution for iPhone and Mac
Apple is rumored to expand its ‘Ultra’…

How AI Is Changing Breakups: A Look at Digital Relationship Endings in 2026
Breaking up is never easy, but in 2026,…

Elon Musk’s Courtroom Performance Raises Eyebrows in Musk v. Altman Trial
Elon Musk appeared less prepared and…

Jury Selection in Musk v. Altman: Public Opinion Challenges Elon Musk in Court
Jury selection in the high-profile Musk…
Google’s New Gradient Icons: A Fresh Look Coming to More Apps
Google is expanding its new gradient…

GPT-5.5: OpenAI’s Latest Breakthrough Is Resetting the AI Bar
OpenAI’s GPT-5.5 has arrived, setting a…

Xbox Game Pass ‘Starter Edition’ Leak: New Bundle with Discord Nitro Revealed
A new leak reveals Microsoft is…

DJI Launches Lito Series: Affordable Entry-Level Drones Starting Under $400
DJI introduces the Lito 1 and Lito X1,…

The End of Human Intimacy: How AI Companions Are Rewiring Our Emotional Lives
Are AI companions truly filling the…


The new brand identity
When you are alone for days or weeks at…