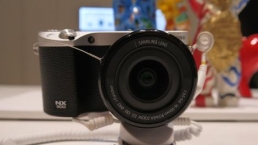
Introduction and features
There are some great compact system or mirrorless cameras around at the moment, but with its solid build, retro SLR-like styling, traditional controls and excellent image quality the Fuji X-T1 is one of our favourites. We’re not alone in this, as it’s also proved very popular with enthusiasts and professional photographers looking for a smaller (and funkier) alternative to an SLR.
Now we have the Fuji X-T10, a slightly more compact mini-me of the X-T1 that uses the same APS-C format 16Mp X Trans CMOS II sensor and EXR Processor, also found in the Fuji X-E2 and Fuji X100T. This sensor also houses phase detection autofocusing points that make up part of the camera’s hybrid AF system, which Fuji claims has a focus time of just 0.06 seconds.
Cut-down size… and features?
Being a little smaller and more affordable than the X-T1, the X-T10 naturally makes a few compromises. One of these is with the electronic viewfinder (EVF), so although the X-T10’s viewfinder has the same 2.36-million dot resolution as the X-T1’s, it’s the smaller (0.39-inch) device that’s found in the Fuji X-E2, with 0.62x magnification rather than 0.77x. The smaller size of this EVF means it’s not possible to see a dual image, with a magnified view alongside the full image, as it is with the X-T1. However, like the X-T1’s EVF, the X-T10’s has lag time of just 0.005 seconds, rather than the 0.05 seconds of the others.

Unlike the X-E2 and X-T1, however, the 3-inch screen on the back of the X-T10 has 920,000 dots where the older cameras’ screens have 1,040,000. As on the X-T1, though, the X-T10’s screen is mounted on a tilting bracket to make it easier to see when shooting landscape images above or below head height.
One area where Fuji hasn’t compromised, however, is with the X-T10’s autofocus system, as it includes the updates that were recently announced for the X-T1. In single AF (AF-S) mode there are three options for setting the focus point: Single, Zone and Wide; and in continuous AF (C-AF) mode there are Single, Zone and Wide/Tracking options. In Wide/Tracking mode the camera selects the autofocus point automatically and in Continuous AF mode it then tracks the subject around the frame, switching AF point and adjusting focus distance as it moves.

Other specification highlights of the X-T10 include a pop-up flash in addition to a hotshoe; a native sensitivity range of ISO 200-6400 with JPEG-only expansion settings taking this to ISO 100-51,200; a UHS-I SD/SDHC/SDXC card slot (the X-T1 has a UHS-II slot); a maximum continuous shooting rate of 8fps for eight images; Wi-Fi connectivity; and the same electronic shutter as in the X100T and X-T1, giving shutter speeds up to 1/32,000 sec. To help less experienced photographers, there’s also a fully automatic mode.
Build and handling
While it doesn’t have the weather resistant build of the X-T1, like other X-series CSCs the X-T10 is still very nicely put together with a pleasantly solid, die-cast magnesium alloy construction. It looks and feels like a high-quality piece of kit, and a proper member of the X-series family.
From the front and rear the X-T10 doesn’t look much smaller than the X-T1. From above, however, it’s clear that the new camera is quite a bit slimmer. Fuji lists the X-T10’s dimensions as 118.4 x 82.8 x 40.8mm, or 4.7 x 3.3 x 1.6 inches, with a minimum depth of 31.9mm or 1.3 inches, whereas the X-T1 measurements are given as 129.0 x 89.8 x 46.7mm, or 5.0 x 3.5 x 1.8 inches, and a minimum depth of 33.4mm or 1.3 inches. The X-T10 also weighs 331g/11.7oz (body only), while the X-T1 is 390g /13.7oz.

The front and rear grips are also less pronounced, but thanks in part to their super-grippy covering, they still work very well and the camera feels safe and comfortable in your hand. I carried it by the grip for a couple of hours or so with the Fujinon XF50-140mm f/2.8 R LM OIS WR lens mounted and it felt secure, if a little front-heavy.
Like the X-T1, the X-T10 has traditional exposure controls, but there aren’t as many dials on the top of the new camera. On the right there’s the exposure compensation dial with settings running from -2 to +2EV, the power switch surrounding the shutter release and the shutter speed dial with settings running from 1 to 1/4000 sec plus Bulb, Time and Automatic.

Over on the left of the top-plate, where the X-T1 has a dial to set sensitivity, is a drive mode dial. In addition to providing a means of setting the camera to Single, Continuous Low (speed) and Continuous High (speed) shooting (up to eight frames per second) this has options for accessing the bracketing, Advanced Filter (there are two settings for this), Multiple exposure and Panorama modes. There are two bracketing options, one for exposure bracketing and another for Film Simulation bracketing, enabling you to produce a sequence of three images with different exposures or different Film Simulation settings.
ISO options
There’s no sensitivity dial on the X-T10, but there are a number of ways of selecting the ISO setting you want. The first option is via the main menu, but there’s also the Quick menu that’s accessed by pressing the Q button. Alternatively, one of the physical controls can be customised to access sensitivity values. The front dial, which by default is used to access the autofocus options, could be a good choice – pressing this dial brings up the available settings, and it can then be rotated to select the correct value. A third option is to allow the sensitivity to be set automatically by the camera. I find this a very good option, as you can set a default value as well as a maximum sensitivity and minimum shutter speed, so you can be confident images won’t be too noisy or suffer from camera shake.
The rear dial can also be pressed as well as rotated, and is used to zoom into the selected focus point or magnify images in review mode. Unusually for this camera, this dial is not customisable, but there are plenty of other customisable controls.
A small switch protruding from underneath the drive mode dial is provided to pop-up the built-in flash. This little flash seems tougher than the flimsy devices on some cameras, and its pop-up spring is quite strong.
Shutter speed and aperture control
When a lens with an aperture ring is mounted on the X-T10, aperture is set either manually, by selecting a value using the ring, or automatically by the camera when the ring is set to A. Shutter speed is set via the shutter speed dial. If both the aperture ring and shutter speed dial are set to A the camera operates in Program mode. If only one is set to A, the camera is in aperture priority or shutter priority mode. For example, if the shutter speed dial is set to 1/60th and the aperture ring is on A, the camera is in shutter priority mode and will set the aperture automatically.

To help less experienced photographers, or when speed is of the essence, Fuji has given the X-T10 a switch that enables users to override the exposure settings and set the camera to fully-automatic mode. This switch sticks out from under the shutter speed dial – it’s near the power switch, but it’s unlikely that the two could be confused.
Although the electronic viewfinder (EVF) is noticeably smaller than the X-T1’s, it is still very good. When the camera is set to the Provia/Standard Film Simulation mode, there’s a very slight boost in contrast and saturation in comparison with the scene that we expect to see with this setting. Details are clear, and there’s no obvious texture in good lighting conditions. In low light some noise becomes apparent, but it’s not objectionable.
I found that I was able to follow the movement of fast-moving cyclists in the EVF when shooting continuously, indicating that the refresh rate is sufficiently high.

The 3-inch screen is also very good, displaying plenty of detail in all but very bright light, when reflections make the EVF a better option for composing images. The fact that the screen tilts up or down is useful for composing landscape shots from high or low angles, but it doesn’t help with upright shots. Because the EVF eye cup extends a little beyond the back of the camera, the screen can’t be tilted completely upright for viewing from in front to help with selfies, but you can always connect the camera to your smartphone and use Fuji’s app to control it remotely to get a self-portrait.
Focus options
When shooting in Single shot or Continuous Low shooting mode and Zone AF mode, the X-T10 has 77 user-selectable autofocus points (rather than the 49 available in Single AF mode), which can be selected in groups of 3×3, 3×5 or 5×5. When Continuous High shooting mode is selected the number of AF points drops to 15 around the centre of the frame, and the zone can bet set to the whole area or a 3×3 square.
By default the AF point selection mode is activated by pressing the down key of the navigation controls on the back of the camera, and the size of the AF zone is adjusted using the front or rear command dial above the thumb and finger grips. The location is shifted via the navigation controls.
In Continuous AF Zone AF mode the camera focuses on the subject within the selected zone, and switches between AF points within the zone as the subject moves. In Wide/Tracking mode the active AF point(s) move across the whole frame (or across the central group in Continuous High shooting mode) as the subject moves, turning green as they become active.
Performance
The X-T10 has the same X Trans CMOS II sensor and processing engine as the Fuji X-T1, so the quality of the images from the new camera doesn’t come as much of a surprise. It’s capable of capturing an impressive level of detail, especially for a 16Mp camera. That’s thanks in part to the sensor design, which doesn’t require an anti-aliasing filter to avoid moire interference.
Noise is also controlled well throughout the native sensitivity range, and even at the maximum setting (ISO 6,400) images retain a high level of detail. JPEG files recorded at this setting have an even texture of luminance noise visible at 100%, but they still look good and there’s enough detail present to produce nice A3 (11.7 x 16.6inch) prints. As usual raw files have some chroma noise, but this can be controlled easily, enabling you to find a good balance between noise and detail.

The JPEGs captured at the lowest expansion setting, ISO 12,800, are pretty good, and even ISO 25,600 produces reasonable results, but I would avoid using the maximum setting unless it’s vital to get an image, as there’s noticeable softening at normal viewing or printing sizes.

Like the X-T1, the X-T10 produces very attractive images in a wide range of situations. Fuji is widely respected for its colour reproduction, and the Film Simulation modes are very popular. My favourite is Classic Chrome, which produces quite muted colours with a warm tone, but the standard option, Provia is a good all-rounder, while Velvia is great for creating images with more saturation. This is backed up by an auto white balance system that performs well in most natural lighting situations, although images shot in very overcast or shaded conditions can look a little cool.
Improved autofocus
A key criticism of previous X-series compact system cameras has been the autofocus performance with moving subjects. The autofocus system improvements brought by the X-T10, and being rolled out to the X-T1 with a firmware upgrade, are designed to address the issue – and there’s a vast improvement. In Continuous Autofocus mode it’s now possible to select points, or zones around the frame and the camera will track the subject within the zone or around the frame. The greatest flexibility comes when shooting in Single-shot or Continuous Low mode, but even in Continuous High mode it’s possible to choose between nine individual points or, as outlined in Build and Handling, move the zone across 15 points.

In Continuous Wide/Tracking mode the AF does a reasonable job of locking onto a moving subject and tracking it around the frame, but busy surroundings can be a distraction, so Zone AF or Single point mode is often a better option. Provided the active zone or single point is kept over the subject the camera does a good job, delivering sharp images on most occasions even in subdued light. I found I was able to get consistently sharp images of cyclists competing in a triathlon on a bright sunny day, and of skateboarders on an overcast day in covered area.

It would be nice if the focusing points could extend a little further out from the centre of the frame when shooting at the X-T10’s maximum rate (8fps), but it’s not a major issue in many situations.
In Single AF mode the X-T10 snaps the subject quickly into sharp focus. It’s also helpful that, as in the new Fuji X-A2, the new Auto Macro function automatically activates Macro mode when close subjects are detected, so there’s no need for a macro button.
Like other Fuji X-series compact system cameras, the X-T10 tends to produce JPEG images with quite high mid-tone contrast. This makes the images look sharp, vibrant and film-like, but their dynamic range isn’t especially high. The general purpose Multi-zone metering system is also a little prone to producing quite bright images, so it’s a good idea to keep an eye on the histogram to make sure brighter areas aren’t lost. Some highlight detail is usually recoverable from raw files, but you still need to take care.
Lab tests: Resolution
We chose three rival cameras to the X-T10 to see how it measured up in our lab tests: the Panasonic G7, Olympus OM-D E-M10 and Sony A6000.
We’ve carried out lab tests on the X-T10 across its full ISO range for resolution, noise (including signal to noise ratio) and dynamic range. We test the JPEGs shot by the camera, but we also check the performance with raw files. Most enthusiasts and pros prefer to shoot raw, and the results can often be quite different.
Fuji X-T10 Resolution charts
We test camera resolution using an industry-standard ISO test chart that allows precise visual comparisons. This gives us numerical values for resolution in line widths/picture height, and you can see how the 5DS compares with its rivals in the charts below.
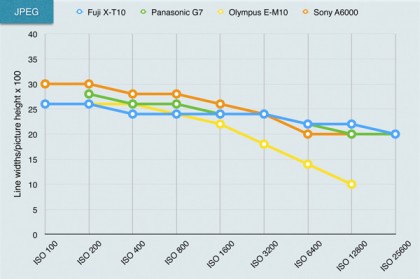
JPEG resolution analysis: While the X-T10 produces images that have an impression of lots of detail, at the lower sensitivity settings it struggles to match the resolution scores of the Panasonic G7, which has a smaller (Four Thirds type) sensor.
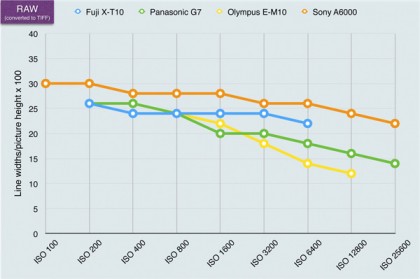
Raw (converted to TIFF) resolution analysis: The X-T10’s raw files (after conversion to TIFF) match the JPEGs for detail resolution, and lag a little behind the G7 at low to mid sensitivity settings. As we would expect, though the X-T10 scores well for a 16Mp camera, it can’t match the 24Mp Sony A6000.
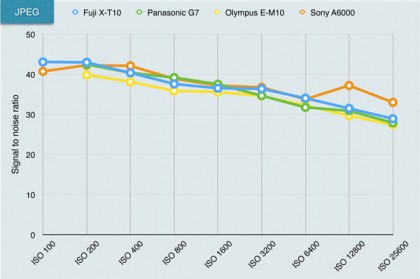
Lab tests: Dynamic range
Dynamic range is a measure of the range of tones the sensor can capture. Cameras with low dynamic range will often show ‘blown’ highlights or blocked-in shadows. This test is carried out in controlled conditions using DxO hardware and analysis tools.

Dynamic range is measured in exposure values (EV). The higher the number the wider the range of brightness levels the camera can capture. This falls off with increasing ISO settings because the camera is having to amplify a weaker signal. Raw files capture a higher dynamic range because the image data is unprocessed.
Fuji X-T10 dynamic range charts
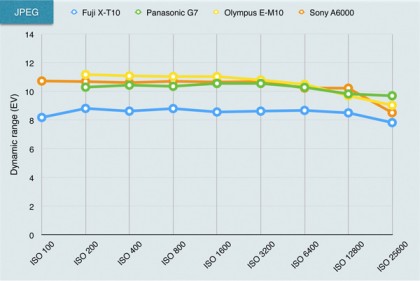
JPEG dynamic range analysis: As we have seen before with Fuji X-series cameras, the X-T10 produces files that have a compressed dynamic range. While this makes them look good, with pleasant mid-tone contrast and enhanced detail, they don’t score especially well in this test. You also need to keep an eye open for lost highlights in some situations.
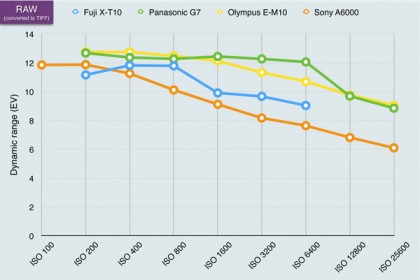
Raw (converted to TIFF) dynamic range analysis: The X-T10’s raw files have a much wider range of tones than the JPEGs, giving greater scope for adjustment of contrast.
Lab tests: signal to noise ratio
This is a test of the camera’s noise levels. The higher the signal to noise ratio, the greater the difference in strength between the real image data and random background noise, so the ‘cleaner’ the image will look. The higher the signal to noise ratio, the better.
Fuji X-T10 signal to noise ratio charts
JPEG signal to noise ratio analysis: These results indicate that the X-T10 controls noise well, especially at the higher sensitivity settings. It also beats the competition at the lowest settings.
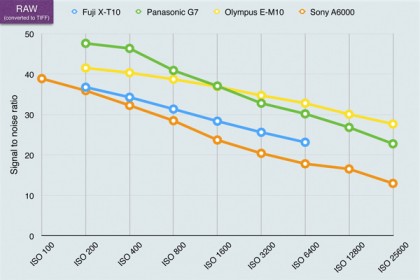
Raw (converted to TIFF) signal to noise ratio analysis: Like the X-T1 which has the same sensor, when raw files are processed using the supplied SilkyPix software they achieve a relatively low score for signal to noise ratio – although it still beats the A6000. This indicates that the files are noisier than those from most of the competing cameras.
Verdict
The big challenge for manufacturers when introducing a camera beneath an existing model is to give the new model appeal without wiping out the attraction of the original camera, and we think Fuji has done a remarkably good job with the X-T10. Its price is attractive, and significantly lower than the current street price of the X-T1, yet the overall build and feel of the new camera is very similar.
Apart from the price, the main differences between the X-T10 and the X-T1 are the lack of weatherproofing, the smaller electronic viewfinder and the loss of the sensitivity dial. As the traditional exposure controls are still present, along with many of the features of the X-T1 (not least the sensor and processing engines), there’s still plenty to offer enthusiast photographers. Meanwhile novices get a bit more help, with a more obvious route to the drive modes and a fully automatic override switch that puts the camera in control of exposure, white balance and colour.
We liked
Although it doesn’t have the weatherproof sealing of the X-T1, the X-T10 feels great in your hand and has all the most important controls within easy reach. As well as enabling quick adjustments to be made, the dials on the top plate enable you to check the setting at a glance without even turning the camera on. Novices will especially appreciate the switch that enables the camera to take control over the settings.
The new autofocus system is a significant improvement on what went before for anyone interested in shooting moving subjects. Helpfully, this is combined with an excellent electronic viewfinder that has a refresh rate that’s high enough to allow fast moving subjects to be followed.
In addition to the useful Quick Menu that enables you to access and change settings quickly, many of the buttons on the camera can be customised to reach the features you use most often.
We disliked
There’s a lot to like about the X-T10, but there are a few areas that could be improved. The sensitivity expansion settings and Advanced Filter options, for example, are JPEG-only. It’s unusual to have ISO 200 as the lowest sensitivity setting for shooting raw files, and it would be nice to be able to apply bespoke noise reduction when processing high-expansion setting raw files. It would also be nice to be able to record a clean raw file when using the Advanced Filter effects.
Fuji’s Quick menu system is very good, but it would be better if it were possible to customise it to access only the options you want. I’m pretty sure Fuji is working on this, so perhaps we’ll see it introduced with a firmware upgrade in the near future. A touchscreen, preferably a vari-angle unit to make it more useful when shooting upright images, would make the Quick menu even quicker to use.
Verdict
The X-T10 is a great camera for those wanting to get more serious about their photography, but it’s also a good choice for more experienced photographers and those looking for a backup to their X-T1. Although it is a compromise on the X-T1, it doesn’t feel like much of one, and it produces the same high-quality images. In addition, the autofocus system has taken a big step forward, making it much easier to shoot moving subjects.
![]()
Related Posts

Apple to Pay $250 Million Settlement Over Misleading iPhone AI Siri Features
Apple has agreed to a $250 million…

OpenAI in Court: Greg Brockman, Elon Musk, and the Battle Over AI’s Future
OpenAI’s president Greg Brockman takes…

Reggie Fils-Aimé Reveals Why Nintendo Stopped Selling on Amazon in the DS Era
Former Nintendo of America President…

Musk v. Altman: Revealing the Early Secrets of OpenAI
Get an inside look at the Musk v.…

Apple’s “Ultra” Era: The Next Evolution for iPhone and Mac
Apple is rumored to expand its ‘Ultra’…

How AI Is Changing Breakups: A Look at Digital Relationship Endings in 2026
Breaking up is never easy, but in 2026,…

Elon Musk’s Courtroom Performance Raises Eyebrows in Musk v. Altman Trial
Elon Musk appeared less prepared and…

Jury Selection in Musk v. Altman: Public Opinion Challenges Elon Musk in Court
Jury selection in the high-profile Musk…
Google’s New Gradient Icons: A Fresh Look Coming to More Apps
Google is expanding its new gradient…

GPT-5.5: OpenAI’s Latest Breakthrough Is Resetting the AI Bar
OpenAI’s GPT-5.5 has arrived, setting a…

Xbox Game Pass ‘Starter Edition’ Leak: New Bundle with Discord Nitro Revealed
A new leak reveals Microsoft is…

DJI Launches Lito Series: Affordable Entry-Level Drones Starting Under $400
DJI introduces the Lito 1 and Lito X1,…

The End of Human Intimacy: How AI Companions Are Rewiring Our Emotional Lives
Are AI companions truly filling the…


The new brand identity
When you are alone for days or weeks at…