
Introduction
Your Mac can do millions of things, but sometimes even the best of us forget some of the cool stuff it can do – so we’re here to help jog your memory.
Some of these tips need recent versions of OS X – such as OS X 10.9 Mavericks or OS X 10.10 Yosemite – but not all of them do. In some cases, some are little features that Apple has sneaked into upgrades that you might have totally missed, and some might be a classic lightbulb moment of “I’d totally forgotten you could do that!”
This is neither a formal nor an exhaustive list; we’ve just put our heads together to gather the fifty tips we think are awesome.
- Check out our review of the new MacBook
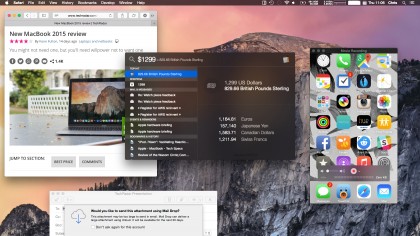
1. Do unit conversions in Spotlight
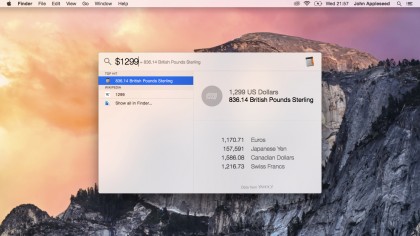
As well as being able to do calculations in Spotlight, in Yosemite it gets an extra trick: unit conversions. You can do specific unit conversions if you need to – “13 stone in lbs”, say – but it’s also intelligent enough that in many cases if you just give it the amount and unit you want to convert, it will suggest not just the likely conversion but also plenty of alternates. Type in ‘$1299’ and you’ll immediately be told what that is in Sterling (based presumably on what’s set as your native currency in the Language & Region pane of System Preferences), and then when the window folds down to show more results, you’ll see Euros, Yen and so on.
2. Talk to and listen to your Mac!

In OS X 10.8, the Mac’s ability to listen to you as well as talk is really impressive. Although these are sometimes framed as being accessibility features, they can be useful for everyone. For example, it’s a good idea to read through any important text before you send it off, but it’s easy to skip mistakes when you’re reading your own work. Instead, select the text and go to Edit > Speech > Start Speaking. You can control the speed and pick from a range of different voices (our favourite’s the Scottish ‘Fiona’) in the Dictation & Speech System Preference pane.
If you find you use the feature often, you should enable the option to trigger speaking aloud using a keyboard shortcut – the default is Option+Esc, which you can change in the Dictation & Speech pane. (If you do have restricted vision, investigate the VoiceOver feature in the Accessibility pane of System Preferences too; this can read aloud buttons and other on-screen items, and more.)
Your Mac is just as good a listener as it is a talker, though. Not only can you control your Mac using Speakable Items (check the Accessibility pane) but in OS X 10.8 you can also dictate text anywhere you would type. By default you just press the Function key twice and then start talking.
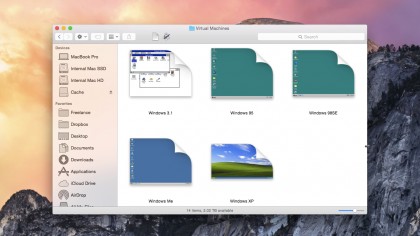
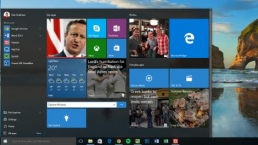
3. Run Windows
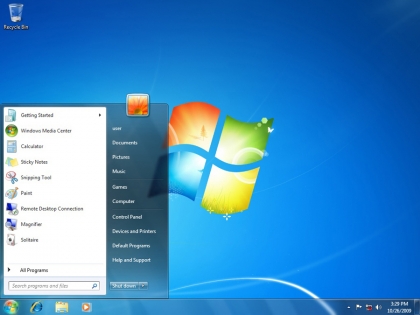
We know, we know – who wants to run Windows? But sometimes it’s handy, whether to play the latest games or run some niche piece of software that has no Mac equivalent. You can either run Windows alongside OS X with a virtualisation app such as VMware Fusion, Parallels Desktop or VirtualBox, or partition your hard disk to install Windows on to run it full-bore on your hardware using Boot Camp Assistant (in your Utilities folder).
4. Add clips from websites to Dashboard
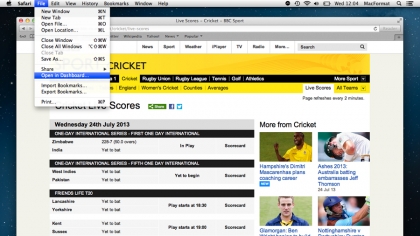
Remember Dashboard? Introduced with 10.4, this overlay holds ‘widgets’ that can perform handy little tasks – Apple still hosts a catalogue of them at apple.com/downloads/dashboard. One oft-forgotten trick is that you can make your own widgets by clipping from web pages. The best bit is that the web page remains live. Here’s how to do it (we’re going to clip out some cricket scores, but it will pretty much work for any part of any site).
1. Navigate to the page you want to clip a section from in Safari. (It has to be Safari, not Chrome, Firefox or whatever.) You can clip out information that’s essentially static – say, a list of keyboard shortcuts you want to refer to – or stuff that’s changing all the time.
2. Go to the File menu and choose Open in Dashboard…; now you can mouse over sections of the web page, and it’s usually smart about snapping to appropriate areas. If not, just click then drag the handles. Once you’re done, click Add at the top right.
3. Once the clipping has been added to your Dashboard, you can click the i at the bottom right to flip it round. Here you’ll see options for the frame; pick the one you like. The web clipping should update anyway, but if you need to force a manual refresh, click it, then tap Command+R.
5. Type exotic characters
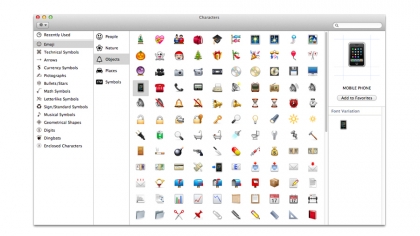
As well as letters and symbols you see on your keyboard, you can type a bewildering array of special characters. You may already be familiar with typing accents such as for café (in that case you either type Option+E then E again or, on OS X 10.7 or later, hold down the E until you get extra options) but you’ll find there are many more.
Go to the Edit menu of most apps and you’ll see Special Characters at the bottom. This panel gives you access to a huge range of symbols you can drag into your documents. Not all apps or operating systems support them, but these are mostly part of the cross-platform Unicode standard. There are probably more than you see at first, too; click the cog to reveal more.
Emoji (those fun, colourful characters available in OS X 10.7 or later) are a notable exception to this cross-platform world. They’re not Apple-only, but your recipient might not be able to see them.
6. Sign PDFs right in Mail

It might be the 21st century, but we’re still using squiggles on a piece of paper to agree to all manner of things. If you are emailed a PDF to sign, though, you don’t have to faff about printing it, signing it, then scanning it back in: you can actually sign it right in Mail. Drag a PDF into the email you’re sending, hover over it then at the top right you’ll see a little button appear; click it, and you get a range of Markup options, including one for signing documents. Best of all, you can either add your signature by holding a signed piece of paper up to the webcam on your Mac – and it does a great job of cutting it out of the background – or by drawing on your trackpad. Got an iPad stylus? Try using that instead of your finger!
7. Batch rename files
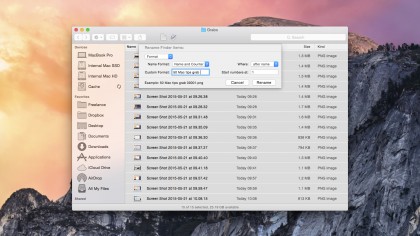
In versions of OS X before Yosemite, renaming a group of files at once either meant third-party software or rolling your own rename script using something like Automator or AppleScript. Now, though, you can just select a group of files and then select Rename either from the right-click contextual menu or from the drop-down button marked with a cog icon in Finder windows. When you do, you get the option of adding text, replacing text, or applying a format such as a name and an automatically incrementing counter.
8. Share easily with friends

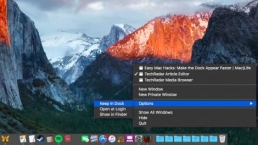
In various places in Yosemite you see the option of sharing things to friends and contacts from a little Share button that looks like an arrow going up out of a box. The best bit, though, is that Yosemite keeps track of how and to whom you most often share stuff, so that if you’re in the habit of sharing funny links with a friend and AirDropping files to a colleague sitting next to you, these options will get stuck to the bottom of the share menu to make it easy to pick those options next time.
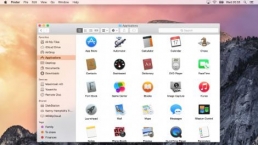
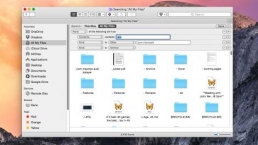
9. Use custom icons (plus, exporting icons
to use elsewhere)
![]()
Back in the day, we all seemed to be adding custom icons to every folder on our system, but it appears to have fallen out of fashion a bit. But it shouldn’t have, because it’s a great way to personalise your Mac and makes it easier to identify folders and other stuff at a glance. Below, we’ll show you how to do it, but here’s a bonus tip as well.
If you want to copy icons to use them in documents, for example, it’s really easy with Preview. Select the item with the icon you want in the Finder and then tap Command+C. Switch to Preview and tap Command+N (which is New from Clipboard) and you’ll see the icon appears in all the different sizes. Pick the one you want (usually the biggest) and then export it to whatever format you need – PNG is often best as it retains the transparency – and drop it into your document.
1. The first step in changing a file or folder’s icon is to find what you want to change it to. Search the web (try interfacelift.com). Go to /System/Library/CoreServices and then right-click CoreTypes.bundle and choose Show Package Contents; you’ll find great system icons including Apple hardware in Resources.
2. Once you’ve found the item whose icon you want to copy – whether it’s a file, folder, app or whatever you like – you need to get further information on it; either go to the File menu and choose Get Info or just hit keys Command+I. Now, click on the icon and tap Command+C.
3. The next step is to paste the icon onto the folder or whatever it is you’re personalising in a similar way. Opt to ‘Get Info’ on it, select the icon and then tap Command+V. If you later want to clear the tweaked icon, then you can select it in this Get Info window then tap .
10. Quickly import with Image Capture
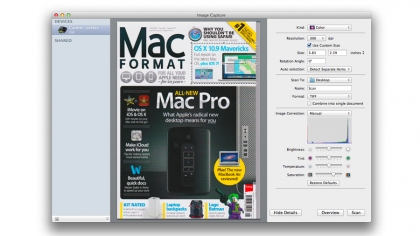
If people sometimes overlook Preview’s power features, they almost always ignore Image Capture completely. Before you clog up your system with bloatware apps and drivers for digital cameras and scanners, though, try Image Capture – it’s in your Utilities folder. With this you can control most modern scanners (or the scanners in multifunction printers) both wired and wirelessly, and import from digital cameras, including iOS devices.
Pop up the panel at the bottom-left for extra options; it’s here, for example, that you tell your Mac what app should launch when you connect each of your devices (including ‘none’) so you could launch Aperture when you connect your SLR, say, but launch nothing when you dock your iPhone.
11. Annotate PDFs and images

Preview has some fantastic tools built into it for annotating images and PDFs. And, what’s best of all is that the annotations it adds to a PDF are based on a standard that’s compatible with Adobe’s PDF app, Acrobat, which is used by Windows users and companies – so it’s easy to share annotated documents with colleagues.
Make sure the Edit Toolbar is visible (from the View menu) and you’ll see you’ve got options for drawing shapes, arrows, speech and thought bubbles and more. There’s also the option to highlight text in different colours, strikethrough some text, add notes and type some text into boxes.
12. Sign your documents
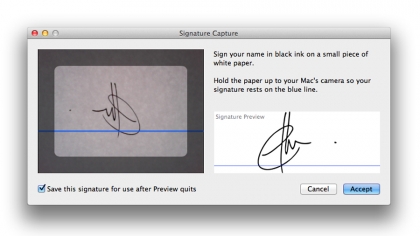
In OS X 10.7, Preview gained the ability to add your signature to documents. To get started, go to the Signatures tab in Preview’s preferences and then click the +. Now, sign your name in black ink on a small piece of white paper and hold it up to your Mac’s webcam. Line it up and click Accept (making sure the ‘Save this signature’ option is checked if you want to use it in the future).
Now open a document you want to sign, pop up the Edit Toolbar and click the signature icon – it looks like an S on a line next to a tiny x. Draw a box to add your signature on the form. You can scale and reposition it afterwards too.
13. Crop, resize and tweak images

Preview is one one of the most underappreciated apps on a Mac; especially in later versions of OS X, it became hugely powerful, and even for us at MacFormat, it does much of what we’d traditionally use a more elaborate and expensive application such as Photoshop for. Do yourself a favour: open an image in Preview and poke around the app’s menus and interface to see what it can do.
For example, you can crop your image. Draw a selection with the regular Rectangular Selection tool then either hit Command+K or choose Crop from the Tools menu. Alternatively, show the Edit Toolbar and make a more complex selection either with the Instant Alpha tool (like in iWork) or use the Smart Lasso. With this tool, you draw as carefully as you can around the outline of the object and then Preview works out as closely as it can where the edges are. In either case, cropping will, if the image isn’t already a PNG, convert it so that you can have the thing you’re cutting out on a transparent background. (You might need the Invert Selection command, too!)
You can also resize images, and even do some tweaks to the colours with the Adjust Color pop-up. Select Adjust Color… from the Tools menu, and you get some handy sliders and a histogram to help you tweak things. Plus, hit the backtick symbol (to the left of Z on a UK Mac keyboard, and to the left of 1 on a US Mac keyboard) to bring up a loupe so you can see what’s happening at 100% as you make changes.
14. Share your passwords and credit card details
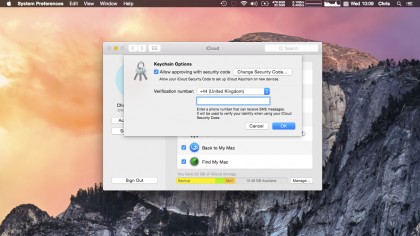
If you have more than one Apple device – whether that’s a work and a home Mac, a Mac and an iPhone, or a couple of iOS devices – then it’s worth turning on iCloud Keychain. This lets you keep your Safari website usernames and passwords, credit card information, and Wi-Fi network information in sync across all your devices, so that, for example, you can quickly log into a website on your Mac having saved a password on your iPad, or enter your secure credit card details automatically on an iPhone having saved them on your Mac. It’s a slightly complex setup, but worth a bit of pain up-front to make your life easier later on; start at this page on Apple’s website to find out how.
15. Make a keyboard shortcut for anything
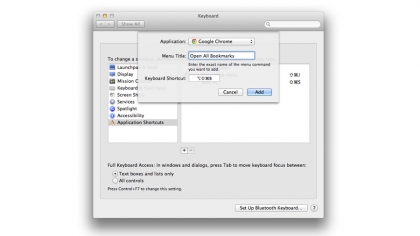
Keyboard shortcuts are great for saving time, but you’re not limited to just the shortcuts put in by developers; if there’s a particular menu option you use all the time that doesn’t have a shortcut, you can create it yourself.
Go to System Preferences > Keyboard > Application Shortcuts. Click the + button to add a new shortcut. You can choose which app you want to apply it to from the drop-down list, but you must know the exact name of the menu command to type into the next box, including the correct case and any special characters such as ellipses. Lastly, choose a unique key combination to invoke the command, then click Add.
16. Use Automator and Services for speed
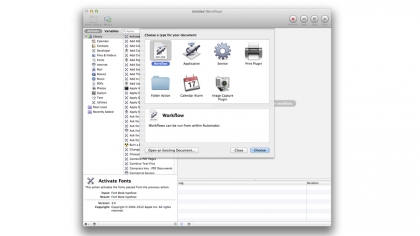
Automator is a tool built into OS X that enables you to build your own workflows of commands, making complex tasks much easier in the future. Use it to build your own little apps that perform a specific task, to make a workflow to modify batches of files, or to create new Services, which are functions you can access from a right-click. You could use Automator to rename a large number of files, to convert images to a different file type, to turn text files in a folder to audio files, and much more.
1. To create something in Automator, open it, then choose what type of thing you want to create: each is useful in different circumstances, so click on them to see descriptions. Select the one you want and click Choose (or open an old Automator file).
2. Start creating the steps of your workflow by dragging Actions from the left-hand side of the screen to the empty space on the right-hand side. Actions are categorised by application and file type, or you can search for something at the top. Just click an Action’s name to see what it does.
3. Once you’ve built up your workflow, you can click Run in the top-right corner to test it (though you won’t be able to fully test everything this way). If there are any problems, the part where it failed will have a red cross next to it, and the log underneath will explain any warnings.
17. Use the app switcher to do more
Most Mac users will be used to using Command+Tab to switch applications, but this little interface is more flexible than it seems at first. For a start, if you bring it up, then keep holding Command and hover your cursor over the icons (or press the ” and ‘ keys), whichever app is highlighted when you release Command is the one you’ll switch to.
Also, when you’ve got an app highlighted, you can do a few other things: press Q to quit an app instantly; press H to hide an app from view; or press the up or down arrows to see the highlighted app’s open windows in Mission Control. Finally, if an app has windows that have been minimised, switch to it, but hold Option when you release Command – the minimised windows will all reappear back from the Dock.
18. View someone’s screen remotely
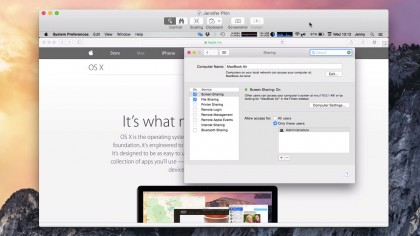
One really easy way to view someone else’s screen or even control their Mac over the internet – which is invaluable if you’re helping troubleshoot a relative’s computer problems – is to launch Screen Sharing by searching for it with Spotlight then entering the Apple ID of the person you’re trying to contact. (If you or they don’t know it, just have them look in the iCloud pane of System Preferences. And while they’re there, make sure Screen Sharing is enabled in the Sharing pane of System Preferences.) They’ll be asked to grant you permission to view their screen, and they can also then click on the screen sharing icon in the menu bar and grant you the ability to virtually, remotely control their mouse and keyboard too.
19. Send and receive SMSs on your Mac (and more!)
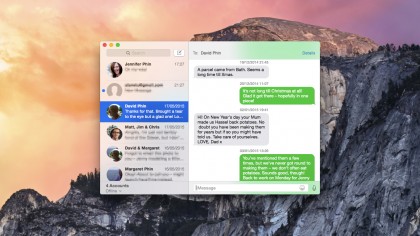
When someone sends an SMS – a text message in the original mobile phone sense – to your iPhone, it appears in a green bubble rather than a blue one, as would be the case if someone sends you an iMessage. Before Yosemite, SMSs would only appear on your iPhone where you’d have to peck out a reply, but now you can have them come into your Mac or other iOS devices when they arrive so you can reply to them from there too. Your iPhone needs to be running iOS 8.1, but once it is, and once you’re signed into your iMessage account that also has your phone number linked to it both on your iPhone and on your Mac or other iOS devices, turn on the Text Message Forwarding option under Settings > Messages on your iPhone. Boom!
20. Mute Messages conversation threads

One of the great things about iMessage is the ability to create a group chat with a few of your friends or colleagues so that it’s easy to arrange meet-ups or discuss work stuff. But these conversations can take on a life of their own, and if your friends’ comedy routines or an irrelevant tangent in a work conversation start to irritate you, you can easily mute a thread so that you can reclaim some Zen. Click Details at the top right of the window when you’re on one of these noisy threads and you’ll see a checkbox marked Do Not Disturb. The chat will keep coming in, but you won’t be notified when replies arrive. (This also, of course, works on one-to-one chat threads.) You can also leave a group conversation completely.
21. Name conversation threads

With loads of iMessage conversations happening at once, it can be easy to lose track of who said what, where, which is especially true if you regularly use multi-people chats and mix work and pleasure. In Yosemite, though, you can name group chats by clicking Details at the top right then typing a name at the top. It might be that you do this for individual, disposable things (“Meeting up for the Cup Final this weekend” or “Promo activity for the new launch”, say), or you could treat it a bit like old IRC channels or rooms, creating one called “Banter” which you and your close friends regularly drop into just for general chat.
22. Record your iPhone or iPad’s screen
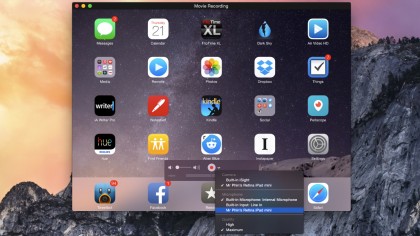
With Yosemite, you can now record whatever happens on the screen of your iPhone, iPad or iPod touch, which isn’t just useful for developers to show off the apps and games they build, but can also be great for things like creating little tutorials or even just recording a bug so you can help a developer or a company fix it.
To use this feature, you just connect your iOS device up to your Mac using its cable, then launch QuickTime Player. The chose New Movie Recording from the File menu and then, if it’s not already selected for you, choose your connected iOS device as the ‘camera’ source from the drop-down menu next to the record button. Choose whether you want to record sound (either from a built-in or external mic, or the audio the iOS device itself is producing) from the same menu, then click the record icon. Once you’re done, you can trim the clip (⌘T) and then easily share it to, for example, YouTube.
23. Adjust the volume in smaller increments

When you use the volume up and down keys on your Mac’s keyboard, the difference between one tap and the next can actually be pretty big – especially if you’re driving some meaty external speakers. Hold down ⌥ and ⇧ as you tap those keys, though, and the increments become much smaller. And here’s a bonus tip: if the audible feedback when you change the volume annoys you, you can turn it off in the Sound section of System Preferences, but, and here’s the clever bit, you can temporarily toggle it back on by holding ⇧ when you change the volume – handy when you’re not sure whether your Mac isn’t making a noise because the system output is configured incorrectly or because the app you’re trying to use is at fault.
24. Share your purchases with your family
With Family Sharing, up to six people in a family can share the same purchases between them, and as a parent you can choose to be alerted (and then approve or reject) purchases your kids make on your card – and you get other benefits such as easily being able to see where everyone is, and getting a shared family calendar.
It’s easy to set up, too. Go to the iCloud section of System Preferences and click Set Up Family, then follow the prompts. If you need more help with Family Sharing generally, check here, or if you just want to get started sharing purchases, go to here.
25. Rename, duplicate and revert files easily
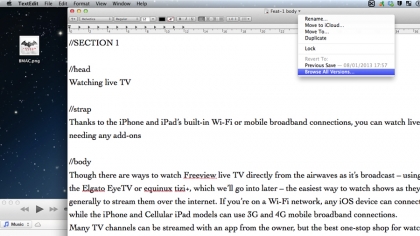
In OS X Lion, Apple introduced some new features for working with files, and a new hidden menu to access them. When you’ve opened a document, move your cursor over its name to bring up a small black arrow just to the right. Click this arrow and you bring up a menu with some of these new options. The most useful are the ability to rename and duplicate files, but you can also lock a file to prevent further editing, change it so that the file is stored in iCloud instead of only on your hard drive (though only in compatible apps), or move the file.
The flashiest feature is the ability to revert to a previous version of a file, though: you can choose an older version from what’s listed in this menu, or click ‘Browse All Versions…’ to enter a Time Machine-like interface, where you can scroll through older versions of that file and compare them to the current one.
26. Switch audio source/output from the menu bar

If you have headphones or speakers set up with your Mac, and if you have a headset or microphone connected, you might find yourself wanting to switch between different inputs or outputs, but this doesn’t have to mean a slog to System Preferences every time: hold Option and click the volume adjuster in the menu bar and it’ll bring up a list of audio inputs and outputs. You can then select the ones you want (though it can’t display too many, so might be limiting for complex set-ups).
27. Store anything you like in iCloud Drive
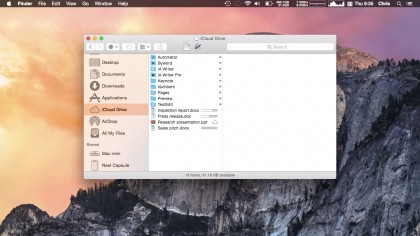
It used to be the case that the only files you could store on iCloud were from specially-built apps such as Apple’s iWork suite, but now we have iCloud Drive in Yosemite, we can chuck any files we like onto the iCloud Drive icon in the Finder sidebar. Those special, ‘blessed’ apps still get their own folders, but you can create your own or just put things loose into iCloud Drive. All those files will sync to other Macs signed in with your Apple ID (so long as you’ve enabled iCloud Drive on them) and will also be available through icloud.com. On iOS, apps that can use iCloud will usually default to opening files from their special folder, but should also allow you to browse through your entire iCloud Drive to open files stored elsewhere.
28. Cure an insomniac Mac
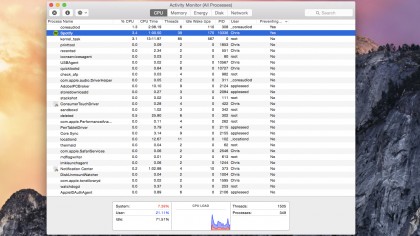
You might find that occasionally when you close your MacBook’s lid or pick Sleep from the Apple menu on your iMac or Mac mini that it resolutely refuses to go to sleep, and this can be no less annoying than when a child does the same. Happily, getting to the bottom of this problem is considerably easier with your Mac. New in Yosemite, you can chose from the View > Column menu when you’re on Activity Monitor’s CPU tab to show a column of processes that are preventing sleep. Click this column header to sort by it, and then you can easily find what apps are keeping your Mac awake, then quit them if necessary.
29. Quick searching within sites
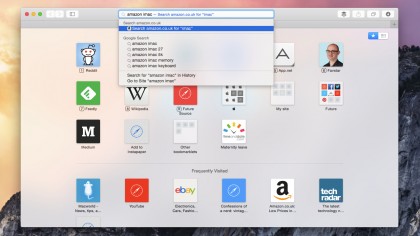
There’s a really cool, badly understood feature in Safari in Yosemite: the ability quickly to search within specific sites right from Safari’s search bar. How it works is this: let’s say you go to amazon.co.uk and search for ‘MacBook’. What actually happens is that you’re redirected to a new URL that looks something like this: http://www.amazon.co.uk/s/ref=nb_sb_noss_2?url=search-alias%3Daps&field-keywords=macbook.
Now, what Safari can do is look at that URL and work out that it’s a search and, just like you could, realise that if you wanted to search Amazon for ‘iMac’ instead of ‘MacBook’, then rather than waiting for the amazon.co.uk homepage to appear before typing ‘iMac’ into the search field and waiting for the results to load, Safari could send us straight to http://www.amazon.co.uk/s/ref=nb_sb_noss_2?url=search-alias%3Daps&field-keywords=imac. See that last word in the URL change? To make that happen, all you have to do is type ‘amazon iMac’ into Safari’s search bar and then you’ll see one of the options is ‘Search amazon.co.uk for imac’; click on this, and you’ll go straight to the results.
You have to do a search – any search – in a site first before Safari can recognise the syntax for a search string, but when you do, you’ll see the sites listed in the Search tab of Safari’s preferences.
You can even type just a part of the target site’s URL. So long as you’ve searched once on Wikipedia, for example, you can type ‘wiki apple’ and you’ll see the option to search Wikipedia for ‘apple’.
30. Close tabs left open on other devices
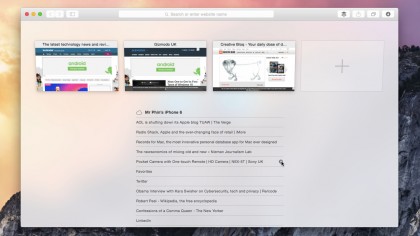
Whether because you suddenly realise you’ve left a dodgy tab open on an iPad you’ve just handed to a colleague or because it’s just flat-out easier to go through and close a bunch of tabs on your Mac rather than on an iOS device, you should know that you can close tabs open on any device signed into your Apple ID from Safari in Yosemite. Click the icon that looks like two overlapping squares in Safari (or choose Show All Tabs from the View menu) and you’ll see all your open tabs on all your devices. Hover over each and you’ll see a close button you can click. (This also works from iOS to Mac; swipe right to left on a cloud tab in its tab view and tap Delete; that tab will then be closed on the Mac.)
31. Share (some) contact details
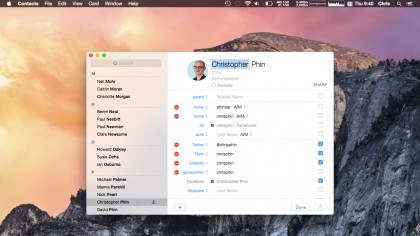
You can easily send someone your contact details either by doing it the old-fashioned way of dragging a contact card out of the Contacts app and then attaching it to an email, say, or by using the new Share commands in Yosemite, but the problem with this basic method is that you might have information on your card you don’t want others to have. For example, you might have defined a relationship with your spouse so that on your iPhone you can say “send a message to my wife” without having to specify who you mean, and you might want to keep that information private for security reasons.
Now, it’s easy. In Contacts’ preferences, click vCard then Enable private me card. Now, when you go to your Me card in Contacts – and you might have to define one first – and click Edit, you get a series of checkboxes next to each field to show whether it would be included when you share a card.
32. Connect to the internet through your iPhone

The iPhone comes with a feature that enables it to share its 3G or 4G mobile broadband connection with other devices (though this must be allowed by your network operator), making it perfect for getting your Mac online wherever you are. There are three ways to connect your Mac to your iPhone to share its signal: Wi-Fi, Bluetooth, and USB.
To begin, go to the Personal Hotspot option in the iPhone’s Settings menu, and turn it on. If you want to connect over Wi-Fi, find the Wi-Fi network created by the iPhone in your Mac’s Wi-Fi options, select it, and enter the password shown in the iPhone.
To connect using USB, plug your iPhone into your Mac and you should get a dialog that takes you to the Network section in System Preferences, from which you can select the iPhone. For Bluetooth, activate Bluetooth on both devices and pair them, and the connection option should again appear in System Preferences > Network.
33. Share a DVD drive with Remote Disc
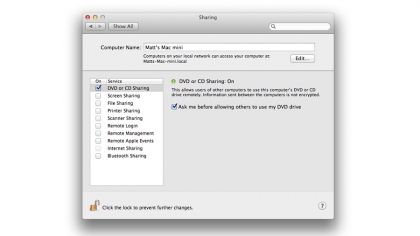
Remote Disc enables you to effectively share a DVD drive between multiple Macs, letting you, say, use an older iMac’s SuperDrive with a MacBook Air to install software. To activate this on the Mac that has the disc drive, go to System Preferences > Sharing and check ‘DVD or CD Sharing’, then insert the disc you want to share. Make sure the other Mac is connected to the same network as the disc-laden one, then open a Finder window and look in the sidebar for Remote Disc in the Devices section. Click it, then double-click the computer you want to connect to.
34. Print to the next available printer
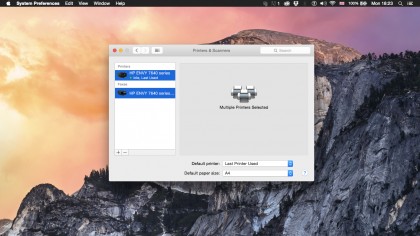
It can be annoying having to wait for someone else to print out large documents when you’re in a hurry, so use this tip to minimise the wait if you have access to more than one printer. In System Preferences > Print & Fax (or Printers & Scanners on recent versions of OS X), you can select multiple printers and create a Printer Pool. You can then select this Pool from the print dialogue in apps instead of your individual printers, and if one printer is in use, your Mac will automatically send the document to one that’s free instead – no waiting!
35. Use Home Sharing to share your iTunes library
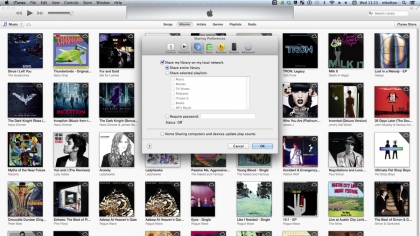
It’s pretty common for members of a family or a shared house to want to share their music or movies with each other, and you can do this easily with iTunes. Go to iTunes > Preferences > Sharing, and then check the box labelled ‘Share my library on my local network’. If you want to limit who can access your library, set a password in the box near the bottom, otherwise everyone will be able to access it.
You can also limit sharing to particular areas or playlists in your iTunes library. Once Home Sharing is turned on, other iTunes users can see your library by clicking the Library drop-down menu in the top-left of iTunes. iOS device users can also access libraries through Home Sharing by going to the More tab in the Music or Videos apps.
36. Share a printer with other Macs
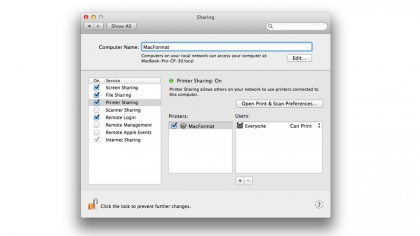
Network printers are massively useful, letting anyone on your network print wirelessly, but if you’ve got a great printer already connected to one Mac and don’t want to replace it, you can still get the same convenience. Go to System Preferences > Sharing and check the Printer Sharing service. This will bring up a screen where you can select the printer to share, and specify who can use it, if necessary. Once this is set up, any Mac on the network can access that printer from the print dialogue, though the Mac the printer is connected to must be turned on.
37. Get wireless audio and video with AirPlay
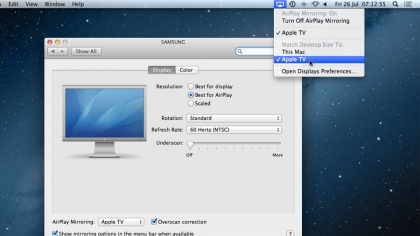
AirPlay is Apple’s technology for streaming audio and video around your house, and it’s available on both iOS devices and Macs. Most Macs can stream audio to AirPlay speakers, while newer Macs can also mirror their displays to an Apple TV, letting you show something on the big screen.
For basic AirPlay output from iTunes, you just need to click its symbol – the rectangle with the triangle cutting into it – next to the volume bar and choose where you want to send the music. If you want all of your system audio to come from the speakers instead of just music, though, hold Option and press a volume control key to open the Sound preferences, where you can choose an output (or use the Menu bar tip we already mentioned).
If an Apple TV is on the same network as your Mac, an AirPlay icon will appear automatically in the menu bar. To start mirroring your screen, select it, then click on the name of your Apple TV.
38. Add a Guest User account to your Mac
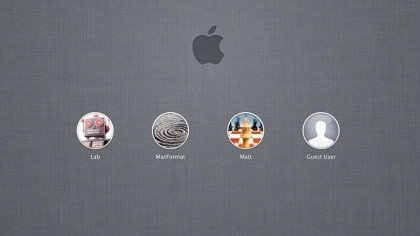
As you probably know, you can add multiple users to your Mac, so that every person in your home or office, say, can have their own space to work and to set things up how they like them. But there’s another kind of account you can turn on: a Guest account.
Turn it on in System Preferences > Users & Groups, and now you’ll be presented with Guest as an option at the login screen. Anyone can use it – no password needed – but once they’re finished everything they do will be wiped. This is great not just for Macs in foyers or spare rooms, say, but it’s also great for if a friend or colleague says, “Can I just borrow your Mac for a minute to do something?”
You probably should turn off Automatic login and set your Security & Privacy settings to require a password after, say, five seconds of sleep or screensaver time. That way you can be sure nobody will be able to access your stuff, but when they try to use your Mac they’ll be offered the option of switching user and can then pick Guest.
39. Restrict what someone can do – and when!
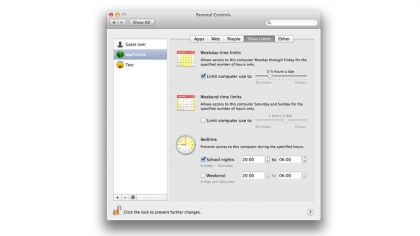
The Parental Controls in OS X are simple, but there are plenty of options in there – some of which are useful for other things than preventing underage access. You can limit computer use to a certain length of time every day, set a ‘bedtime’ after which users won’t be able to use the computer, limit the functions of the Finder, limit what apps that user can use and more. You could, for example, disallow a nervous computer user from modifying the Dock or changing their password.
40. Cover your tracks in Safari
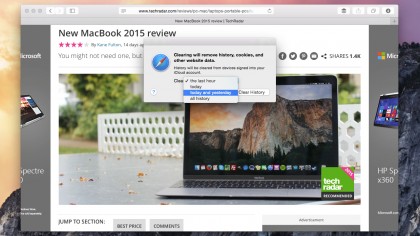
It used to be in Safari that if you wanted to delete caches and history, you only had the nuclear option: nix everything. In Yosemite, though, when you choose Clear History and Website Data from the History menu of Safari, you get the option of covering your tracks by clearing data from the last hour, today, today and yesterday or, as before, from all time. It clears your history from all devices signed into your iCloud account too.
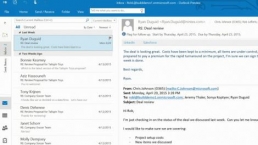
41. Email huge files
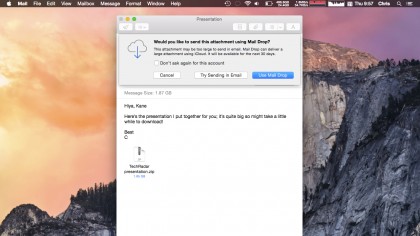
Email isn’t really meant for file transfer, but let’s be honest, we all do it. Problem is, many email providers flat-out won’t let you send attachments over a particular size (often only a few megabytes) so sending large files over email is usually a no-no. With Mail in Yosemite, though (and in fact with the webmail version of Mail at icloud.com), you can email files up to 5GB in size. What in fact happens is that the attachment really gets uploaded to iCloud, and then a link is sent to your recipient where they have 30 days from which to download it. (If your recipient is using Mail on Yosemite/icloud.com, they’ll probably just see the attachment in their email client as usual rather than being shown a link.)
42. Find menu bar options quickly using Help

Some apps have more menu bar options than you can hope to keep track of, but instead of searching through each drop-down list manually, you can use the last Help menu to speed things up. It contains a search box, where you can type in the name of the option you’re looking for. Results come up underneath it, and hovering over a result will show you which menu it’s in, or you can just click the result to select it.
43. Throw files from your Mac to your iPhone
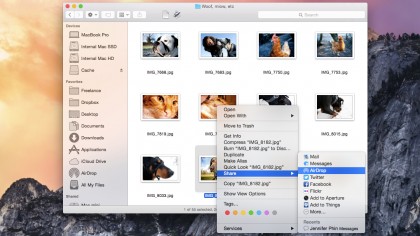
Don’t forget that if you have a modern Mac that has Bluetooth 4 and a recent iOS device (iPhone 5 or later, for example), then you can easily send files from your Mac to your iOS device using AirDrop. The quickest way to do this is to right-click on the file you want to send then pick AirDrop from the Messages fly-out menu, then pick the device you want to send it to. (You’ll have to have AirDrop turned on from the Control Centre of the iOS device first.)
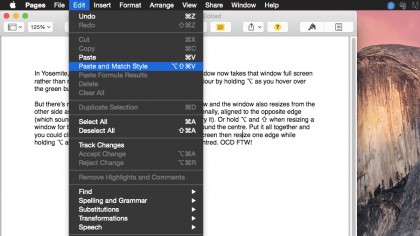
44. Resize your windows like a window-resizin’ pro
In Yosemite, clicking the green button at the top left of a window now takes that window full screen rather than maximising it, but you can restore the old behaviour by holding ⌥ as you hover over the green button.
But there’s more! Hold ⌥ as you resize one side of a window and the window also resizes from the other side as well. Hold ⇧ and the window resizes proportionally, aligned to the opposite edge (which sounds a bit confusing but makes sense when you try it). Or hold ⌥ and ⇧ when resizing a window for the whole thing to shrink down proportionally around the centre. Put it all together and you could click the green button to make a window fill the screen then resize one edge while holding ⌥ and ⇧ so that you make it smaller but keep it centred. OCD FTW!
45. Take control of your windows

You can be quite flexible when it comes to windows in OS X – not only can you drag from any side to resize them these days, but you can also hold Option to resize them from two sides at once (the one you’re dragging and the opposite one), or hold Shift to resize it while keeping it locked to the same proportions. And while we’re talking about windows, if you want to move any that are in the background without bringing them to the fore, hold Command and then drag them around.
46. Paste text without keeping its formatting
When you copy text from some applications, and especially from the web, you tend to also copy its formatting, such as the text size, font choice and so on. When you then paste this into some text fields, such as in an email, it looks out of place, and can make things hard to read. To paste the text without its original formatting (so it just formats in the same way as the rest of what you’re pasting into), instead of pressing Command+V, press Option+Shift+Command+V. Microsoft Word actually has a ‘Paste Special…’ (or ‘Paste and Match Style’) menu option to do the same thing.
47. Change which app a file is opened with
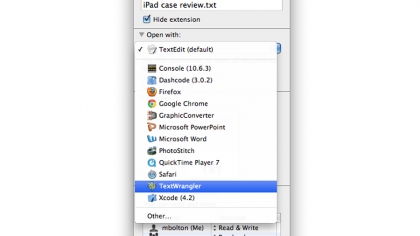
If you want a file to open in an app other than its default, select the file and press Command+I, to show its information. In the ‘Open with:’ section, use the drop-down menu to choose a new app. If you just close the window here, that change will only be applied to that one file; if you want other files of that type to use that same app, click ‘Change All…’ beneath the drop-down menu.
48. Have things ready at log-in
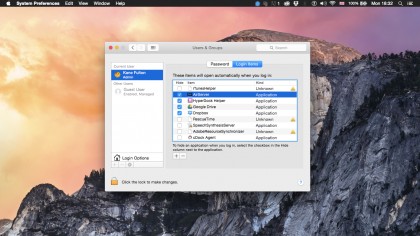
If there are certain apps that you’ll always want to have open when you start up your Mac, you can set this up in System Preferences. Go to Users, make sure your user account is highlighted, then click Login Items. Click the + and you can choose an application, file server or pretty much anything else that should open when you log in. Once you’ve added something, you can use the checkboxes to opt to hide it, though it will still be running in the background. Having lots of these set up can make your Mac slower to start up, though, so if you need to speed things up and temporarily don’t need them running, hold Shift while OS X is logging you in to suppress them.
49. See your Mac activity with Activity Monitor
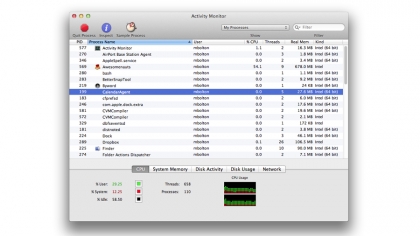
If you find your Mac is running slow, or the fans are kicking in when you don’t appear to be doing anything too intensive, you can see if you can identify what’s causing it. Activity Monitor in OS X shows you how your Mac’s resources are being used. Launch Activity Monitor from the Utilities folder to see current processes, and the resources they take up. The columns show you things such as the CPU usage of a process or the RAM it’s taking up. If there’s a process that’s hogging resources and you’re confident it’s not needed, you can end it by selecting it, then clicking Quit Process. If you’re just curious about how system resources are being used, click the tabs (CPU, System Memory and so on) to see graphs of your usage over time.
50. Back up your Mac
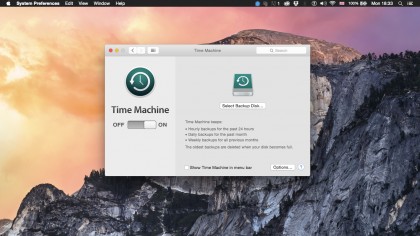
Okay, so we know that people haven’t actually forgotten they can back up with their Mac, but we also know that so many people don’t bother. Please do! Ever since OS X 10.5 Apple has made it easy to back up using Time Machine. Ideally you should be doing other things to back up as well, but at least do Time Machine; you can pick up a 2TB drive for less than sixty quid. Go on. Do it today!
![]()
Related Posts

Apple to Pay $250 Million Settlement Over Misleading iPhone AI Siri Features
Apple has agreed to a $250 million…

OpenAI in Court: Greg Brockman, Elon Musk, and the Battle Over AI’s Future
OpenAI’s president Greg Brockman takes…

Reggie Fils-Aimé Reveals Why Nintendo Stopped Selling on Amazon in the DS Era
Former Nintendo of America President…

Musk v. Altman: Revealing the Early Secrets of OpenAI
Get an inside look at the Musk v.…

Apple’s “Ultra” Era: The Next Evolution for iPhone and Mac
Apple is rumored to expand its ‘Ultra’…

How AI Is Changing Breakups: A Look at Digital Relationship Endings in 2026
Breaking up is never easy, but in 2026,…

Elon Musk’s Courtroom Performance Raises Eyebrows in Musk v. Altman Trial
Elon Musk appeared less prepared and…

Jury Selection in Musk v. Altman: Public Opinion Challenges Elon Musk in Court
Jury selection in the high-profile Musk…
Google’s New Gradient Icons: A Fresh Look Coming to More Apps
Google is expanding its new gradient…

GPT-5.5: OpenAI’s Latest Breakthrough Is Resetting the AI Bar
OpenAI’s GPT-5.5 has arrived, setting a…

Xbox Game Pass ‘Starter Edition’ Leak: New Bundle with Discord Nitro Revealed
A new leak reveals Microsoft is…

DJI Launches Lito Series: Affordable Entry-Level Drones Starting Under $400
DJI introduces the Lito 1 and Lito X1,…

The End of Human Intimacy: How AI Companions Are Rewiring Our Emotional Lives
Are AI companions truly filling the…


The new brand identity
When you are alone for days or weeks at…