How to install a third party keyboard on Android

Your Android device could have come with any number of different keyboards. It might be the best one around or it could be absolutely awful, it’s all down to the whims of the manufacturer.
But Android thrives on freedom and you needn’t be stuck with the keyboard your device shipped with. There are dozens of alternatives and installing a new one is simple.
So whether your current keyboard auto-corrects the sense out, of your messages or you’re simply wondering what else is out there, you’re just a few steps away from something shiny and new.
Step 1 – See what’s out there
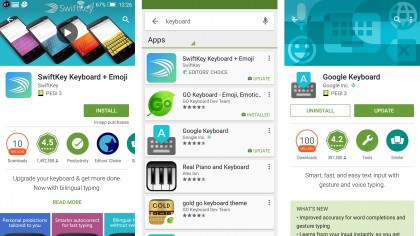
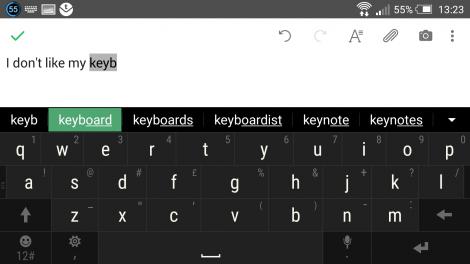
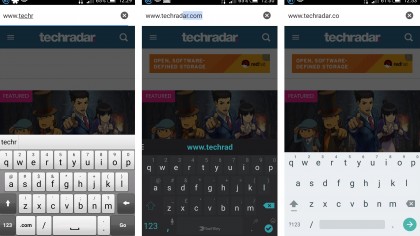
There are loads of keyboards available and a quick search for ‘keyboard’ on Google Play will give you plenty to choose from.
Finding the right one can be trickier. Your best bet is to take a look at the reviews and screenshots and see if it looks like a good fit. If you can identify exactly what you dislike about your current one it could be easier to filter through them too.
However we’ll kick you off with two suggestions. There’s SwiftKey for one, which is highly customisable, lets you swipe-to-type and learns from you for more accurate auto-correct. Or there’s Google Keyboard, which has many of the same features, a clean interface and the might of Google behind it.
Step 2 – Install and enable it
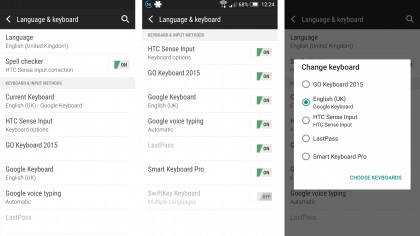
Once you’ve picked a keyboard, you’ll want to download and install it from Google Play. Then you need to enable it. In many cases launching the app will guide you through the process, asking you to first enable the keyboard and then set it as your default one.
However if you’re not prompted you can manually do it from your device’s settings screen. Head to the ‘Language & keyboard’ section, then tap ‘Current Keyboard’. If you see the one you want in the list tap it to set it as your default. If you don’t see it tap the ‘Choose Keyboards’ option, enable the one you want and try again.
Note that the exact wording of these screens may differ based on your handset and what version of Android you’re running, but they’ll be along those lines.
You can also achieve the same thing by going onto any screen where you’d enter text so the keyboard pops up. You’ll then see a keyboard icon at the top of the screen. Swipe down the notifications shade and tap that to get to the change keyboard screen.
Step 3 – Get to grips with it
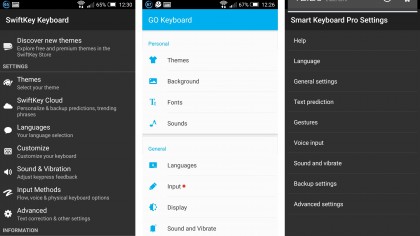
Congratulations, you now have a new keyboard! You’ll want to test it out thoroughly to make sure it’s the one you want. Some keyboards have extra tabs and buttons which allow you to customise them, while others will display customisation options when you enable them or tap on them in the settings screen.
What and how many options you’ll get depend on the keyboard, but they can cover everything from the appearance, size and layout of the keyboard to gestures, voice input and more.
Not happy with it? Then just head back to Google Play and try another. There’s bound to be one out there with your name on it.
Step 4 – Switching back
If after all that you’ve decided that actually you miss your original keyboard it’s easy to switch back. Just head back to the ‘Language & keyboard’ section of the settings screen or tap the keyboard icon on the notifications screen when the keyboard is visible and reselect your old one.
If you’re fairly sure you won’t want to return to the one you’ve downloaded then you might as well delete it too, so it doesn’t clog up your storage.
![]()
Related Posts

Apple to Pay $250 Million Settlement Over Misleading iPhone AI Siri Features
Apple has agreed to a $250 million…

OpenAI in Court: Greg Brockman, Elon Musk, and the Battle Over AI’s Future
OpenAI’s president Greg Brockman takes…

Reggie Fils-Aimé Reveals Why Nintendo Stopped Selling on Amazon in the DS Era
Former Nintendo of America President…

Musk v. Altman: Revealing the Early Secrets of OpenAI
Get an inside look at the Musk v.…

Apple’s “Ultra” Era: The Next Evolution for iPhone and Mac
Apple is rumored to expand its ‘Ultra’…

How AI Is Changing Breakups: A Look at Digital Relationship Endings in 2026
Breaking up is never easy, but in 2026,…

Elon Musk’s Courtroom Performance Raises Eyebrows in Musk v. Altman Trial
Elon Musk appeared less prepared and…

Jury Selection in Musk v. Altman: Public Opinion Challenges Elon Musk in Court
Jury selection in the high-profile Musk…
Google’s New Gradient Icons: A Fresh Look Coming to More Apps
Google is expanding its new gradient…

GPT-5.5: OpenAI’s Latest Breakthrough Is Resetting the AI Bar
OpenAI’s GPT-5.5 has arrived, setting a…

Xbox Game Pass ‘Starter Edition’ Leak: New Bundle with Discord Nitro Revealed
A new leak reveals Microsoft is…

DJI Launches Lito Series: Affordable Entry-Level Drones Starting Under $400
DJI introduces the Lito 1 and Lito X1,…

The End of Human Intimacy: How AI Companions Are Rewiring Our Emotional Lives
Are AI companions truly filling the…


The new brand identity
When you are alone for days or weeks at…